Quickstart
Summary
This guide helps you get a quick start on the Sedaro platform and introduces key paradigms and actions. Within a few minutes, you should have a satellite in orbit. Within a few more minutes, you can visualize it proactively pointing at and linking with a ground station. Here are five stages we'll walk you through:
- Satellite in orbit
- Satellite pointing nadir
- Satellite sending data to a peripheral ground point in direct flyover
- Satellite proactively pointing at ground point
- Analyzing results
The Agent-Scenario Paradigm
Two of the most important types of objects in Sedaro are the scenario and the agent. The scenario is the environment and time window you want to simulate, e.g. LEO on June 21st from Midnight to 4AM. The agents are all the actors within your scenario, such as satellites, drones, terrestrial vehicles, etc. In virtually every simulation, you will put one or more agent inside your scenario.
Peripheral Agents
Some agents are simple, but aren't the star of your show. We call these "peripheral" agents. You might need them in your simulation in supporting roles, but they don't offer complex behavior and don't do very much. A peripheral agent might be a point on a map that you want to point your satellite at or it could be some other space object, where you only know its orbit. Because they are so simple, you can quickly add these agents directly into the scenario. We'll do that a little later.
Templated Agents
The real standout performers on stage are what we call "templated" agents. These agents can be modeled with a high level of fidelity, have complex behavior, and act autonomously - a digital twin, if you will. (Or ... they can be more simple - you have flexibility to choose the level of fidelity with these types of agents.) You would use a templated agent for a satellite or other system for which you want more analytics in your scenario.
We need to treat templated agents a bit differently than peripheral agents though. For templated agents, you actually first spec out a model outside of the scenario (aka a "template"), and then you add a copy of the template to the scenario. It's an extra step, but it goes pretty quickly. We'll walk you through how this works on our very first satellite in orbit.
Why do we do treat templated agents differently? Reusability. If you decide to build a complex templated spacecraft agent, you probably don't want to have to build it out from scratch each time you want a new one in your scenario. If you build a template first, you can just reuse that template over and over again, putting one copy in one orbit position and another copy in another orbit position, etc.. You only had to do the detailed modeling work once, but you get the benefits of reusing it as many times as you need. In some simulations, we've used tens and even hundreds of the same template.
Git?
The last thing you need to understand is that we use terms like repositories and branches in our approach to version control, which is loosely aligned with Git (the version control approach that inspired Github). This functionality is there for those who want to use it, but you don't have to engage with it much if you don't want to. The only thing you will want to know is that a repository acts like a file folder that stores a model and related content (e.g. a spacecraft model) and a branch is like a version of your model, e.g. "version 1 of my spacecraft." All this only applies to scenarios and templated agents. You can pretty much ignore everything else as optional.
Enough paradigm talk, let's get started.
1. Satellite in Orbit
Add Models In Your Workspace
In this step, we'll add the two new repositories - one for our scenario and one for our spacecraft. We do that from our workspace home screen.
-
Add a new Repository of Model Type “Spacecraft”. Name it "My Spacecraft Model".
a. Click the new Spacecraft item on your dashboard to open it.
b. Click the pencil icon on the row titled "main" and rename it to "Version 1".
-
Add a new Repository of Model Type “Scenario”. Name it "My Scenario Model".
a. Click the new Scenario item on your dashboard to open it.
b. Click the pencil icon on the row titled "main" and rename it to "Version 1".

1.1 Renaming the Branch
Configure Scenario
Next we'll configure the scenario. We'll choose a time window for our simulation and add our spacecraft template to the scenario. (We actually don't need to do any extra configuration for our spacecraft before we simulate. New agent templates are simulatable out-of-the-box.)
-
Open the Scenario (“Version 1” branch).
-
Set a simulation time window and click Save: 2025-06-21 00:00:00 through 2025-06-21 04:00:00
-
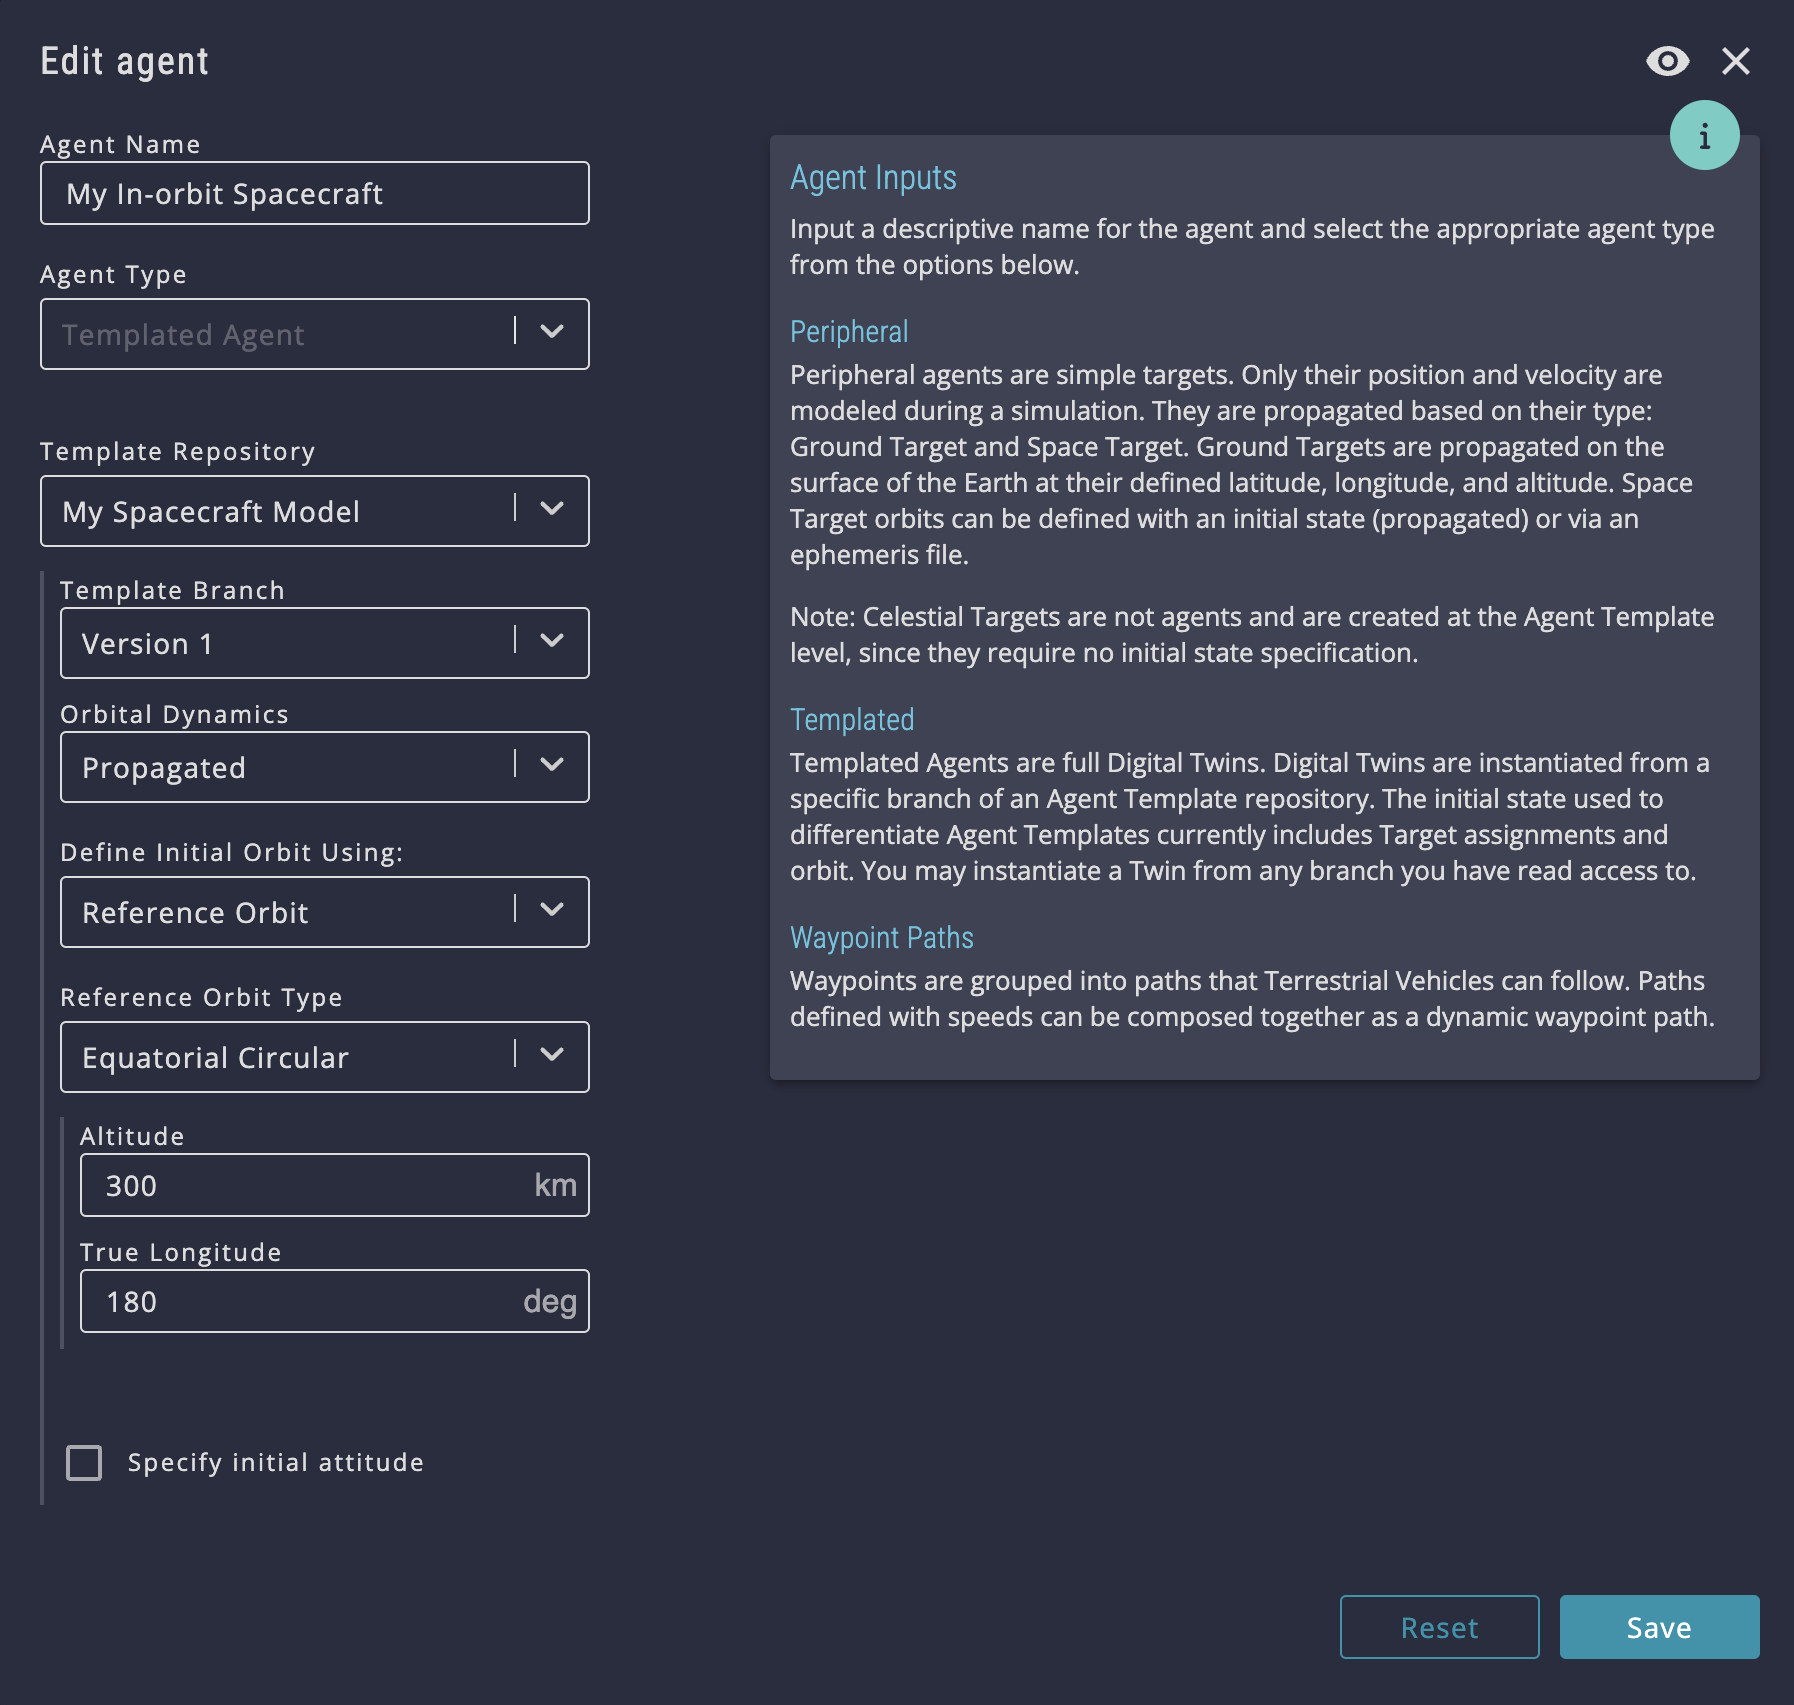
In the Agents section, add an agent:
a. Agent Name: My In-orbit Spacecraft
b. Agent Type: Templated Agent
c. Template Repository: My Spacecraft Model
d. Branch: Version 1
e. Define the initial Orbital Dynamics: Propagated > Reference Orbit > Equatorial Circular orbit with an Altitude of 300 km and True Longitude of 180 degrees.
-
Click Simulate. When it's finished, you'll see your satellite following the specified orbit. Notice that it isn't pointing at anything meaningful though. We’ll handle that next.
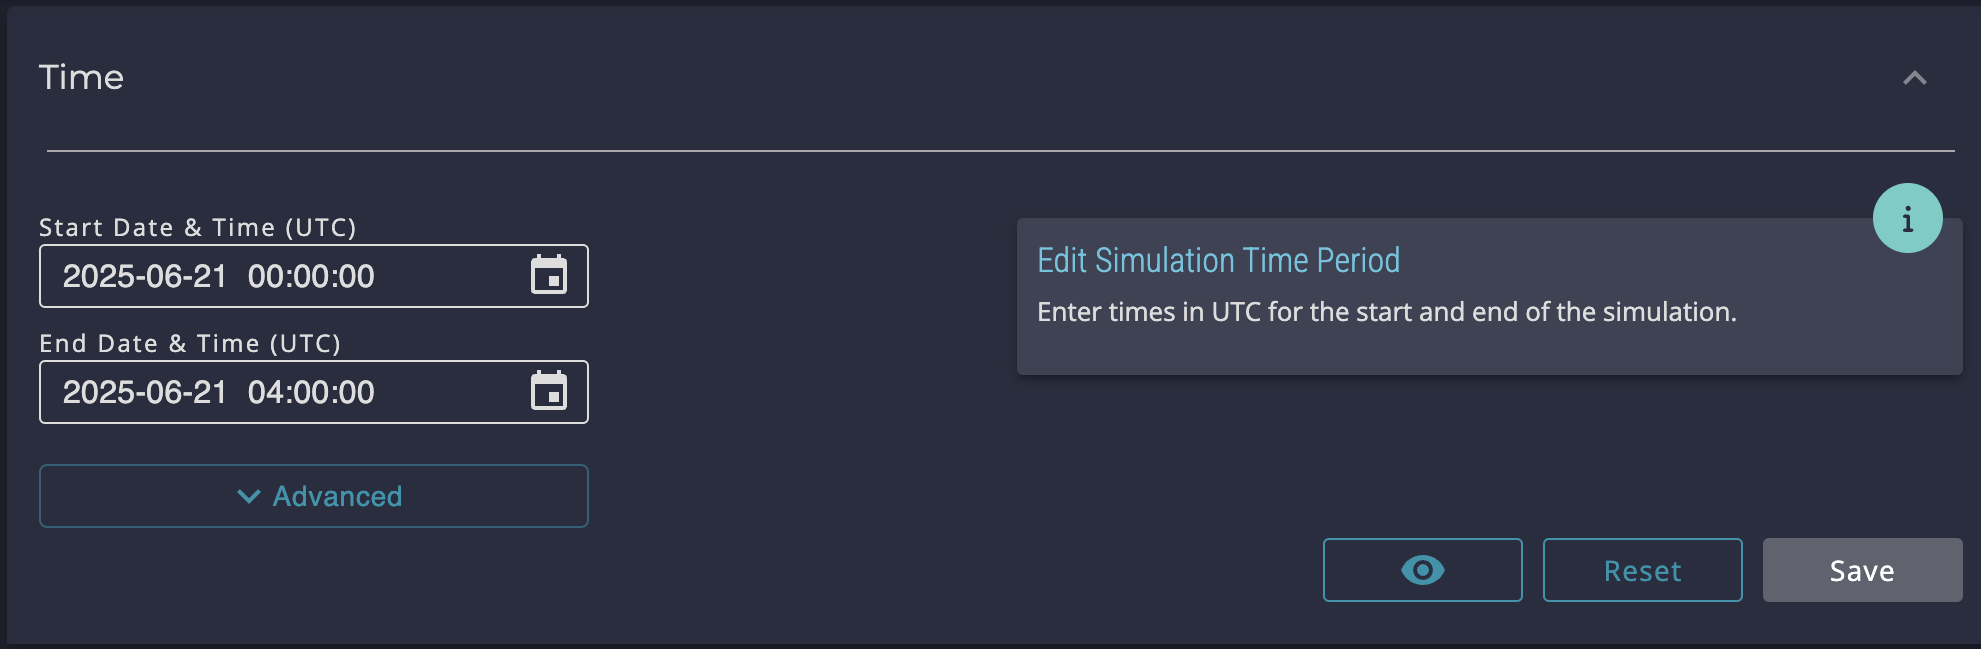
2.1 Setting Scenario Time Settings
3. Add an agent
Notes
New spacecraft templated agents are ready to simulate out of the box with the following configuration.
- 6 Bodyframe vectors, which you can edit or delete.
- A Default Power Processor, which must exist, but you don't have to do anything with it.
- Convenience Entries (Battery Cell, Solar Cell, Set of Surface Materials, Set of Thermal Interface Materials), which you can choose to use, ignore, or delete.
- Passive Pointing Mode, which you can replace.
(Optional) You could also open the agent template and update the CAD model. If you are using Sedaro in an academic class setting, you could humor your professor by uploading a .glb file of Rick Astley for your spacecraft model.
In the future you can name the repositories, branches, and agents whatever you want.
(Optional) To optionally create a new version of either of your models, select "Branch" once you have selected the repository.
2. Satellite Pointing Nadir
Configure the Agent
In this step, we'll define a vector pointing from our space craft to the earth and tell our spacecraft to point one of its axes along that vector.
-
Navigate back to your workspace home screen by clicking your workspace name in the breadcrumbs in the upper left-hand of your screen (hint: its just to the right of the Sedaro logo and name).
-
Open your Spacecraft repository, Version 1.
-
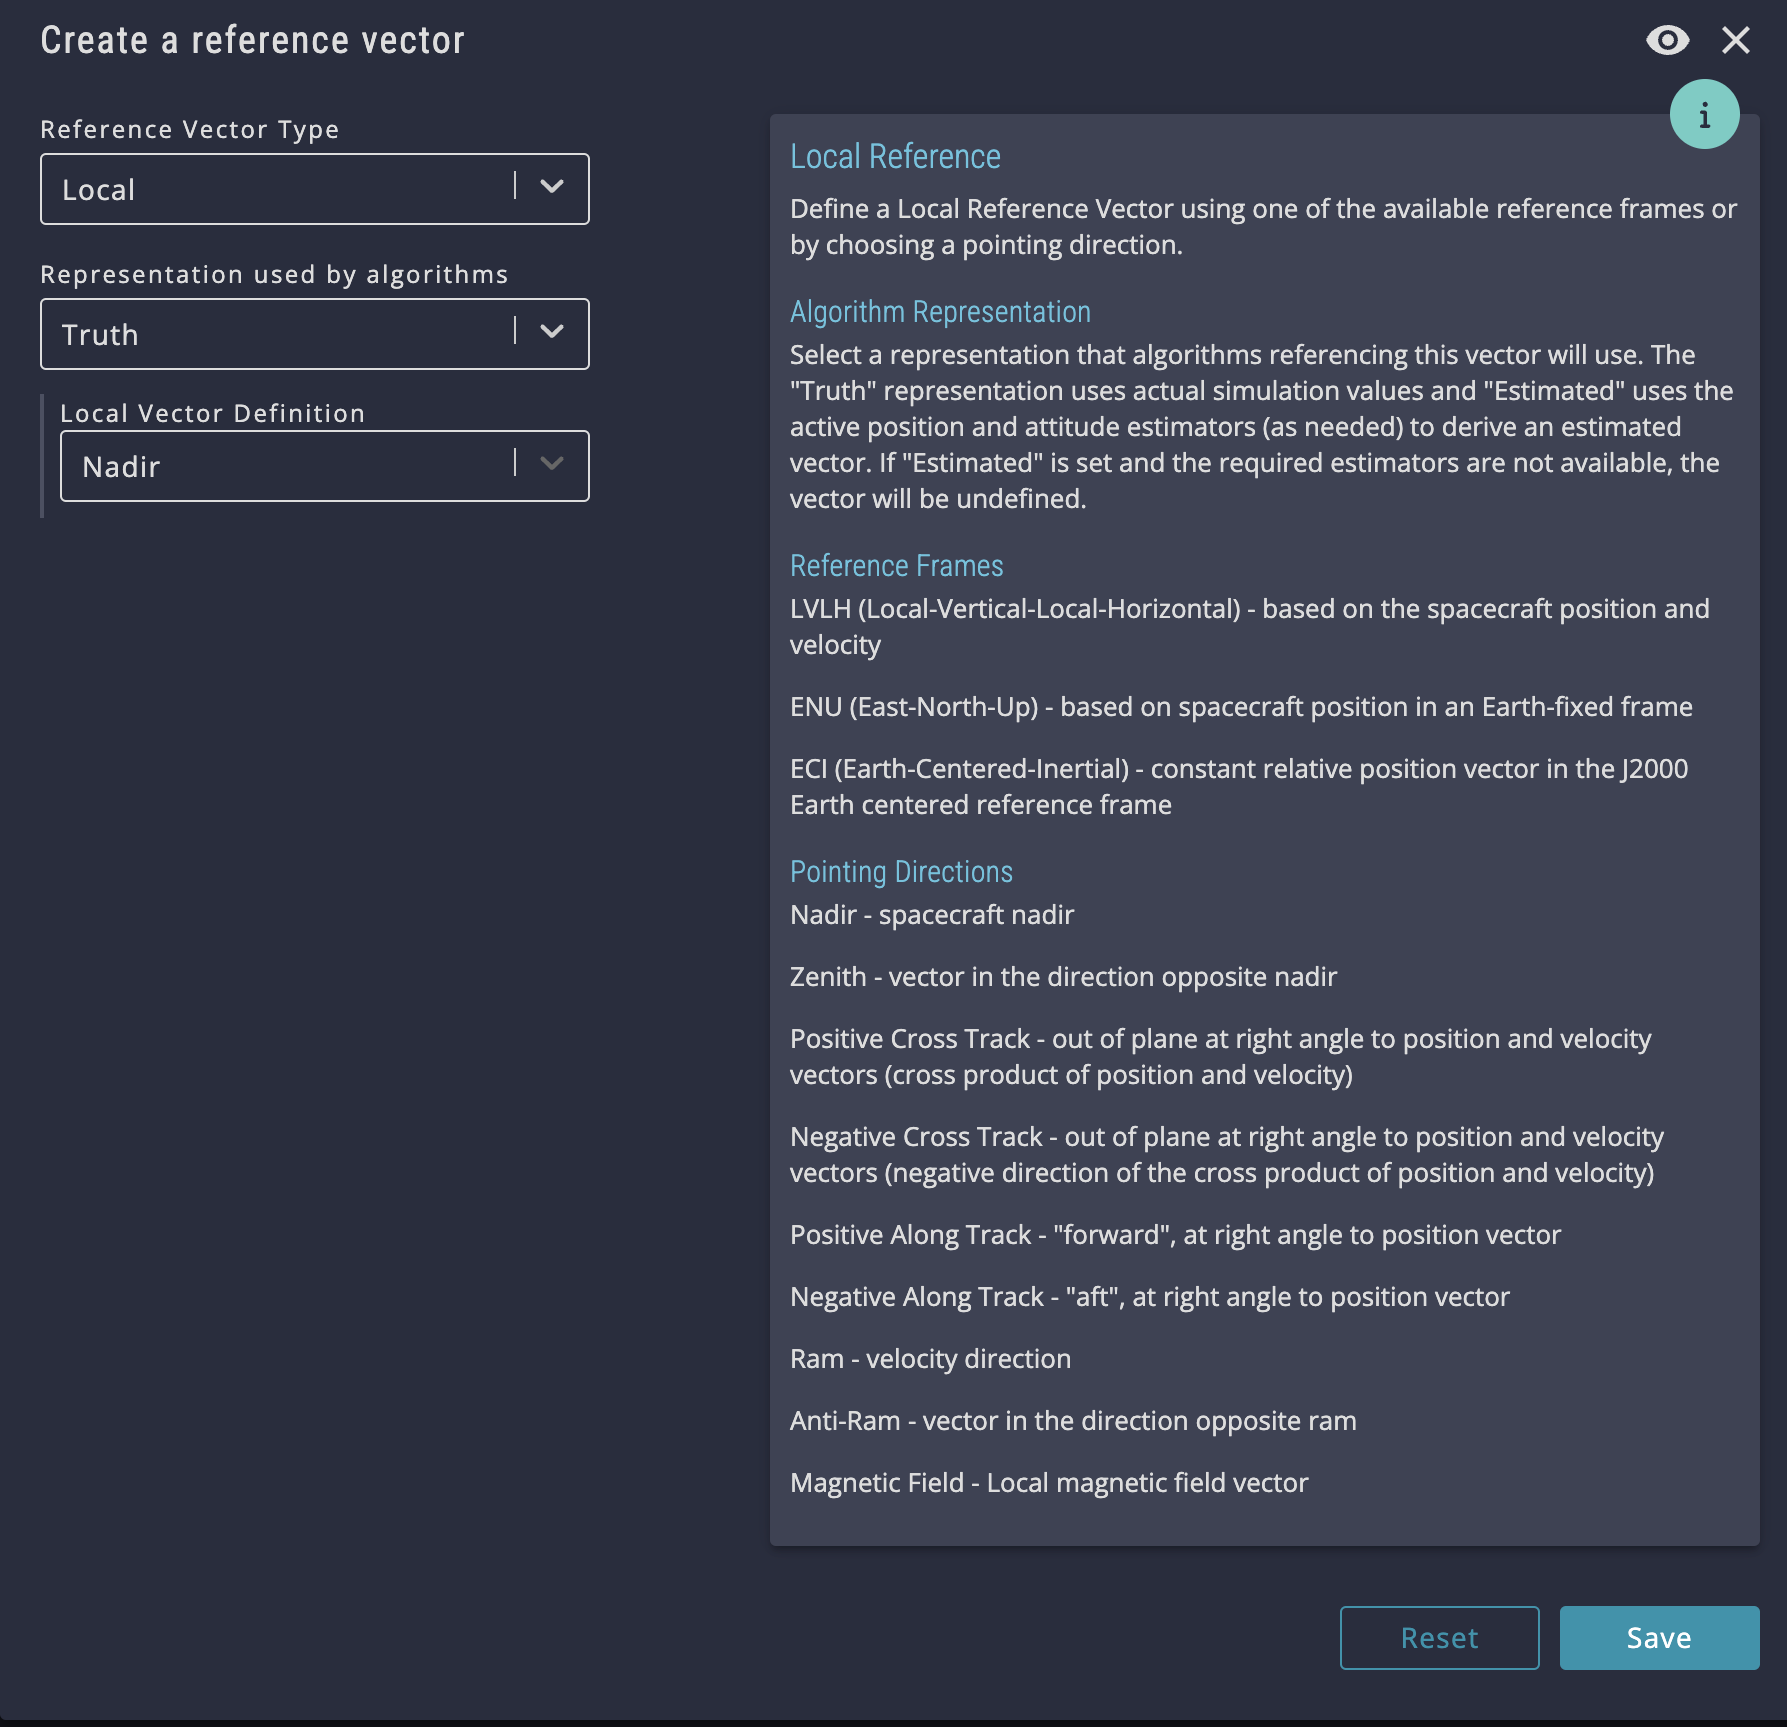
In the Geometry > Reference Vector section, add a Reference Vector:
a. Reference Vector Type: Local
b. Representation used by algorithms: Truth
c. Local Vector Definition: Nadir
-
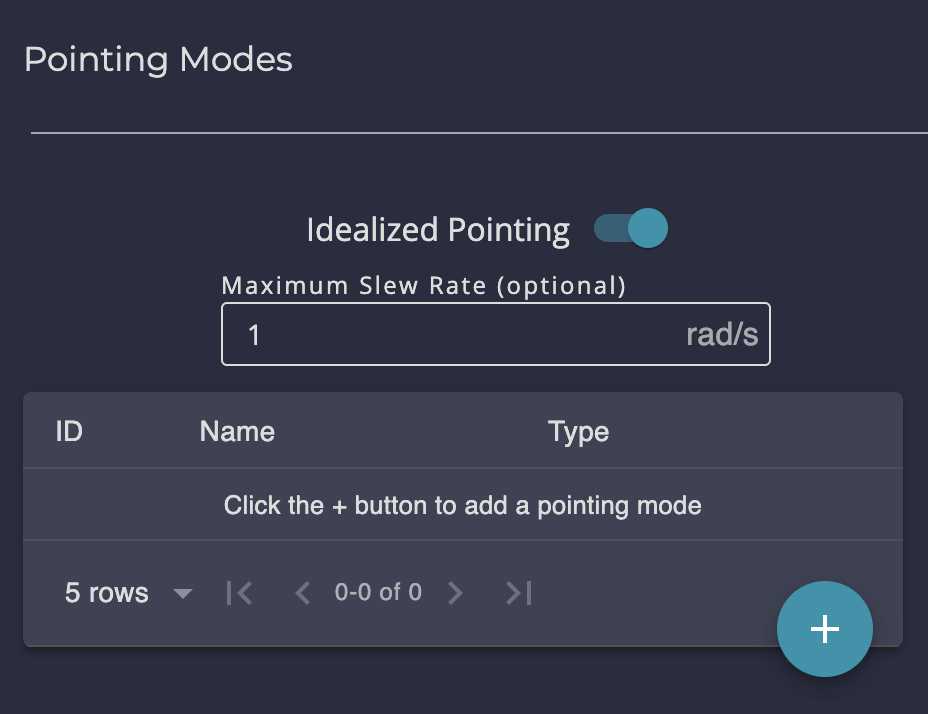
In the GNC > Pointing Modes section:
a. Delete the existing Passive pointing mode
b. Toggle on Idealized Pointing
c. (Optionally) Add a slew rate of 1 and Save
d. Add a Pointing Mode (see image below for configuration settings)
-
Navigate back into your scenario model and simulate again. The satellite will now point Nadir throughout its orbit.
- Hint: you can technically have your scenario and agent template open in two separate browser windows to prevent needing to navigate back and forth. After you make a change in the agent template, just remember to refresh the scenario browser window.
3. Add a reference vector
4b and 4c. Turn on idealized pointing and add a slew rate
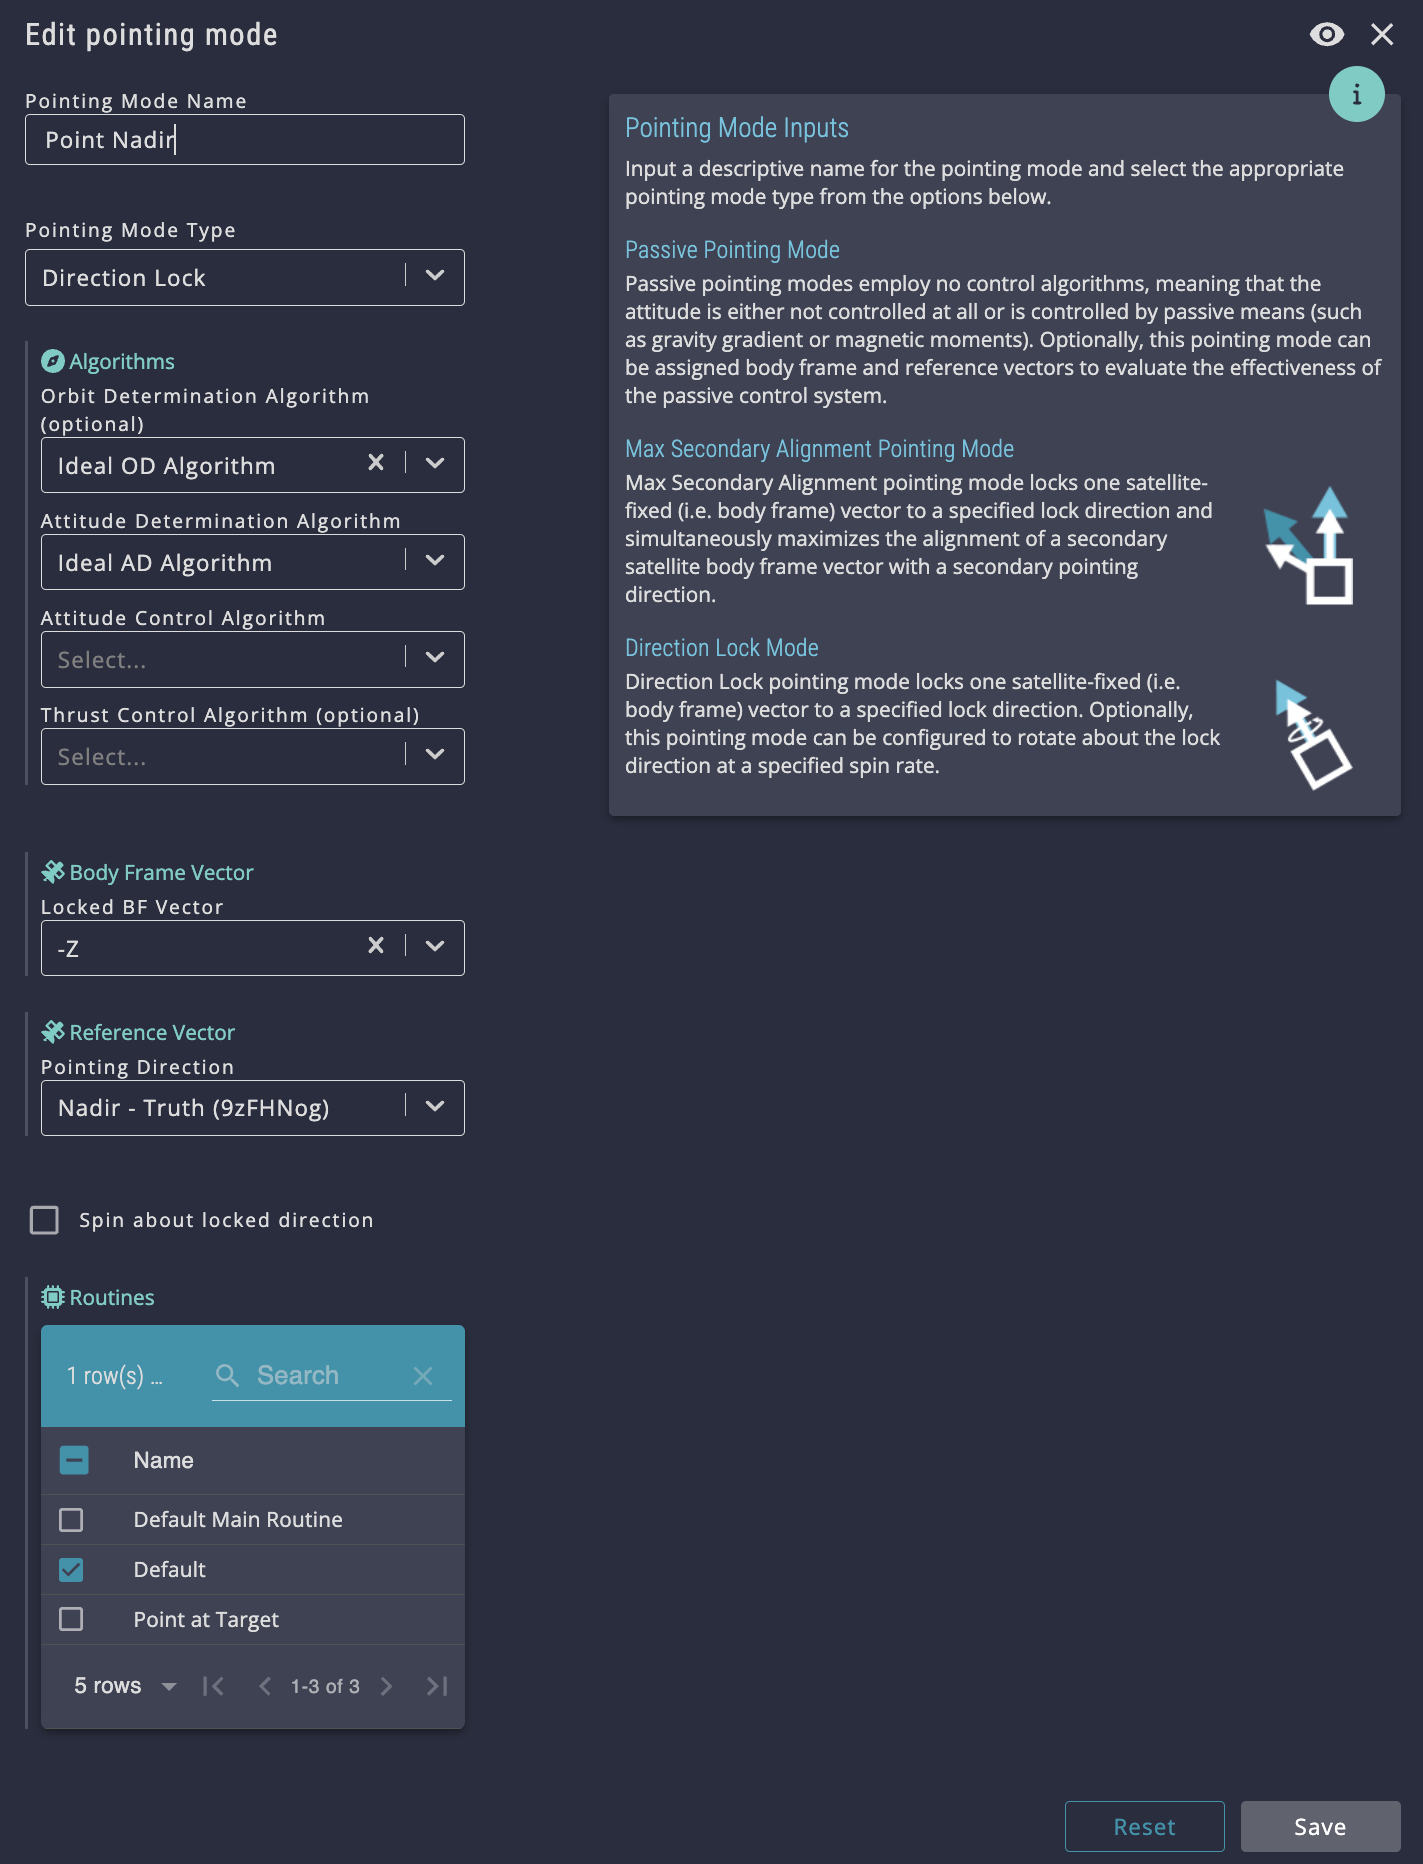
4d. Add a pointing mode
Notes
- This is the common editing pattern: when you want your templated agents to do cool things, make the edit in the template. Those changes will be applied to each copy in your scenario.
- Reference Vectors can be based on the simulation’s “true” knowledge of what the vector should be. Alternatively, it can be “Estimated”, which relies on sensors being set up.
- Adding a slew rate to idealized pointing is optional.
- Routines are like operational modes. By assigning a pointing mode to the single, default routine here, that pointing mode will always be active.
3. Linking to a peripheral target
Configure Communications in the Agent Template
-
In the Geometry > Fields of View section, add a field of view:
a. Field of View Name: Antenna FoV
b. Boresight Body Frame Vector: -Z
c. Field of View Type: Circular with 60 degree Canonical Half Angle
-
In the Targets > Targets section, add a ground target with a name of "Ground Target Placeholder".
-
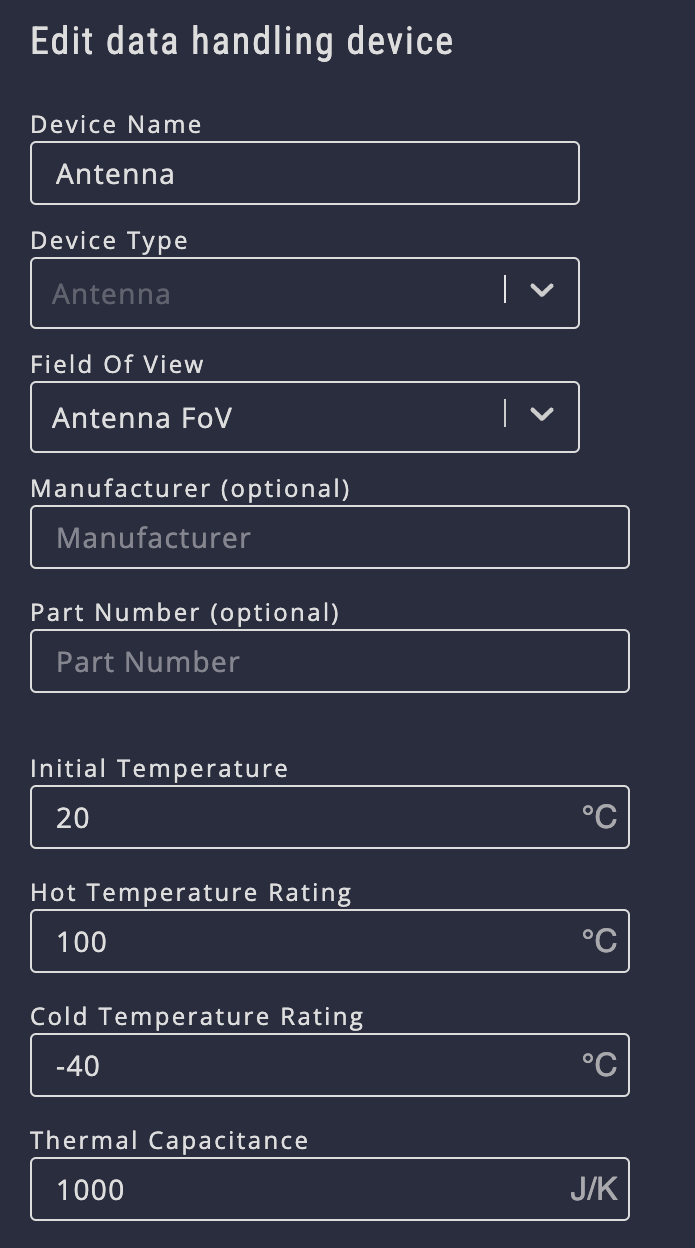
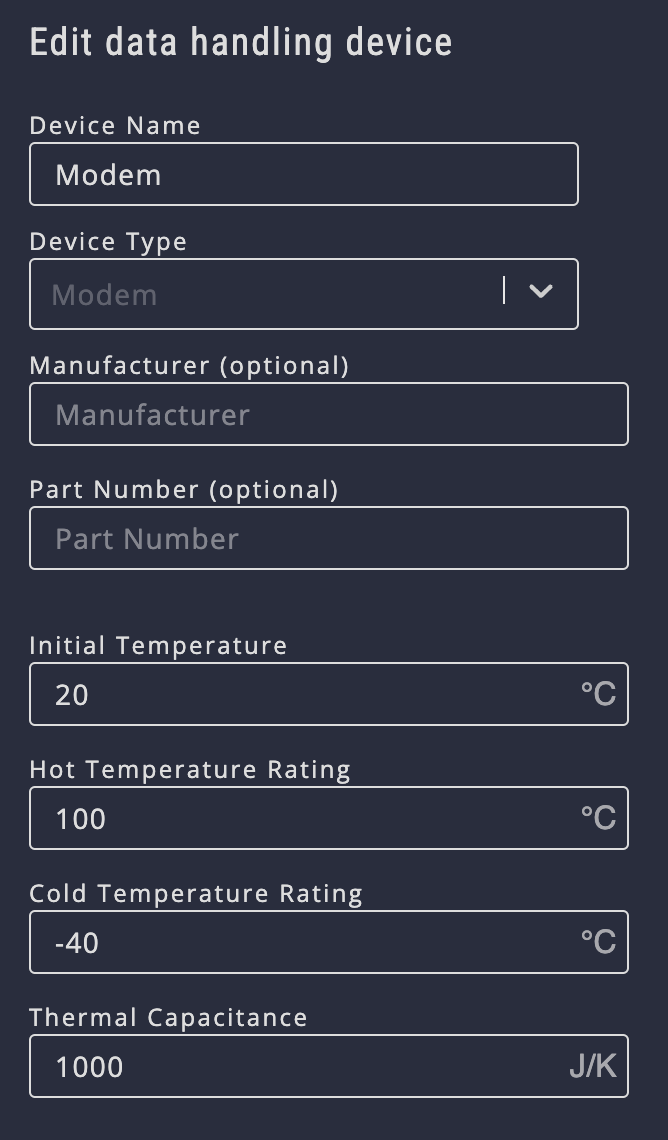
In the Data Handling section:
a. Add a Data Type with a name of "Mission Data"
b. Add 2 Devices: Modem and Antenna (see visual below for parameters)
c. Add a Data Interface (see visual below for parameters)
d. Add a Data Mode (see visual below for parameters)
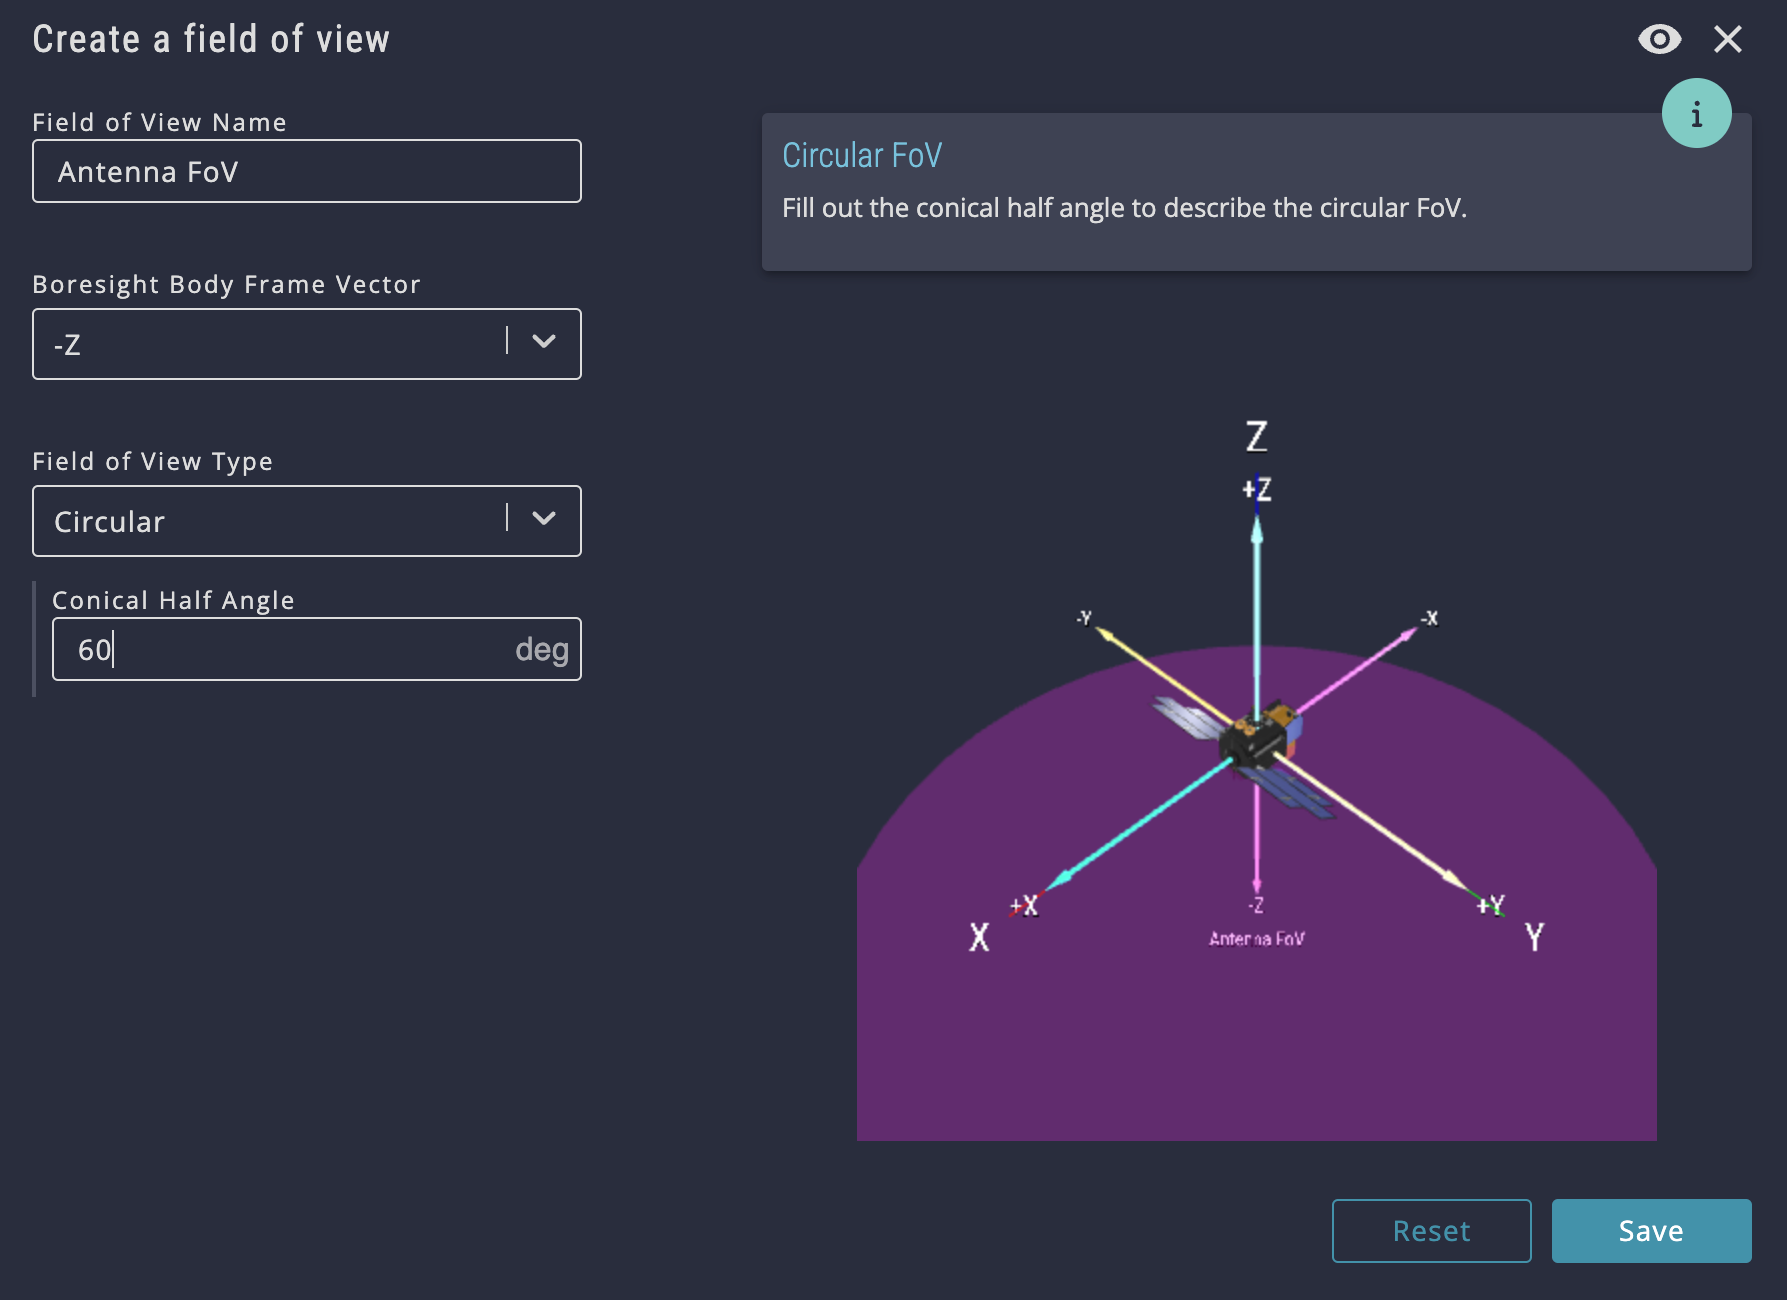
1. Add a field of view
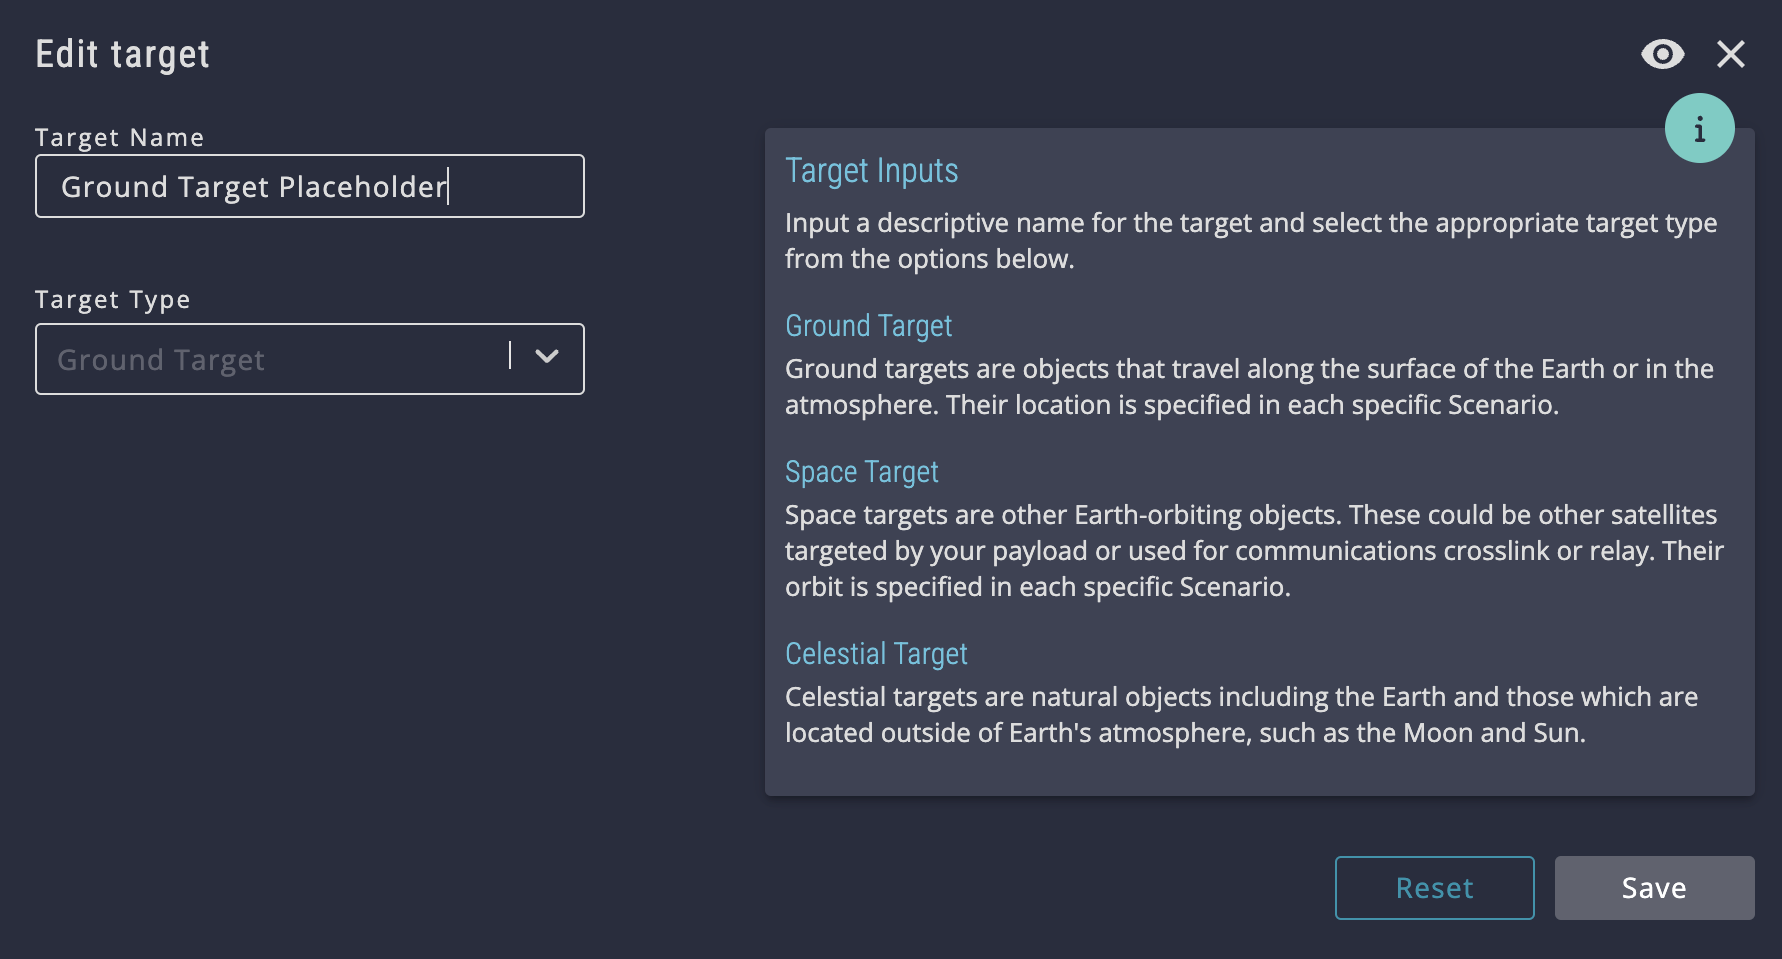
2. Add a ground target
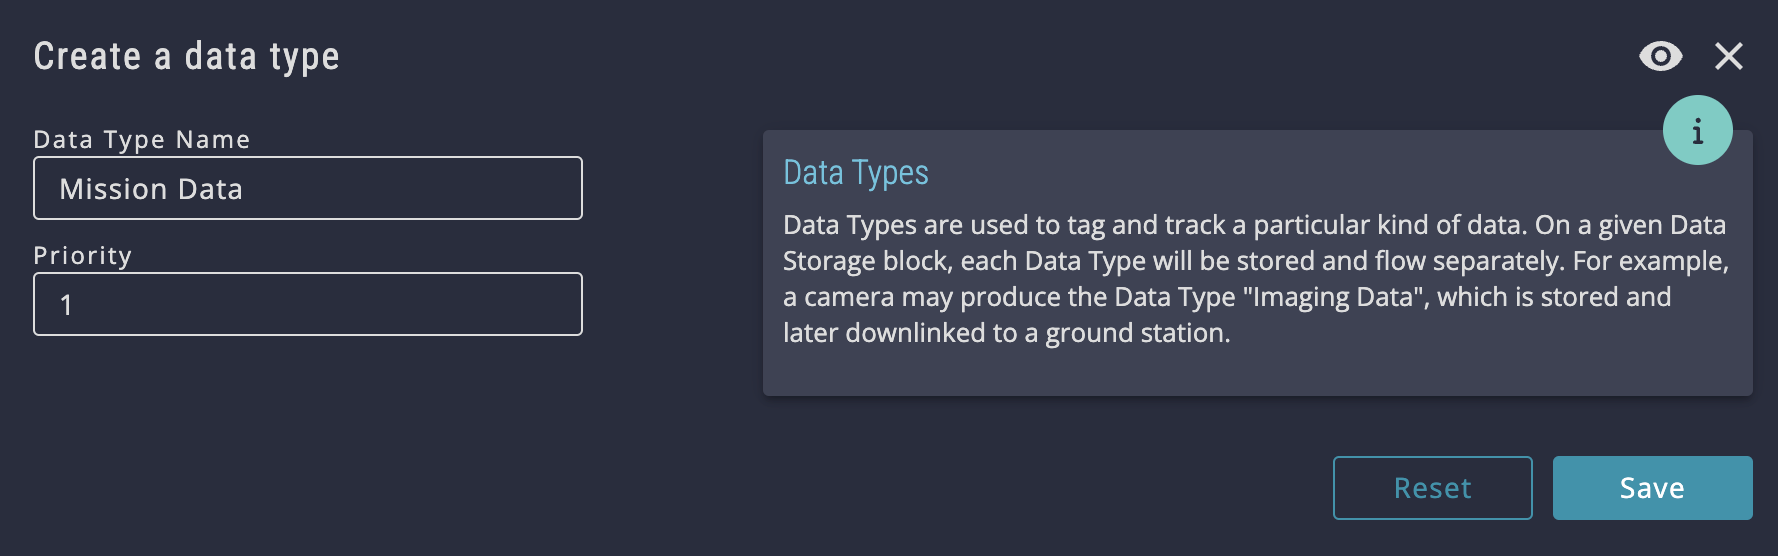
3a. Add a data type
3b. Add a modem
3b. Add an antenna
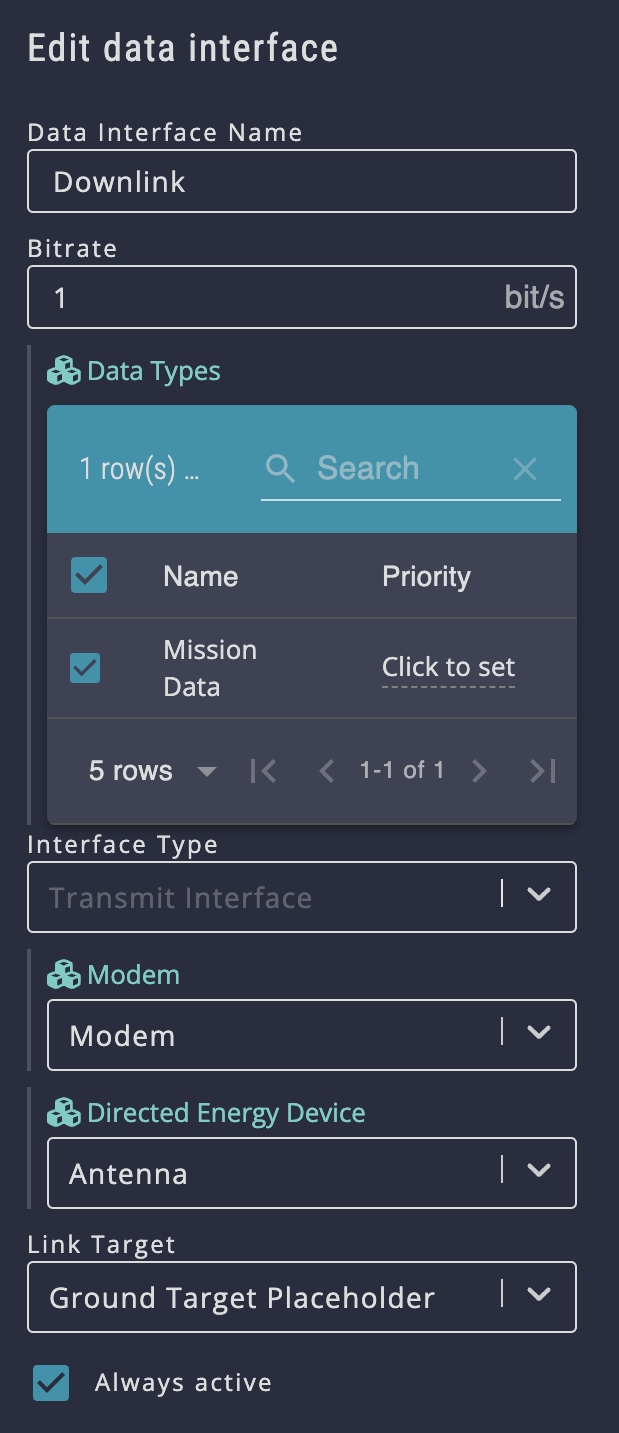
3c. Add an interface
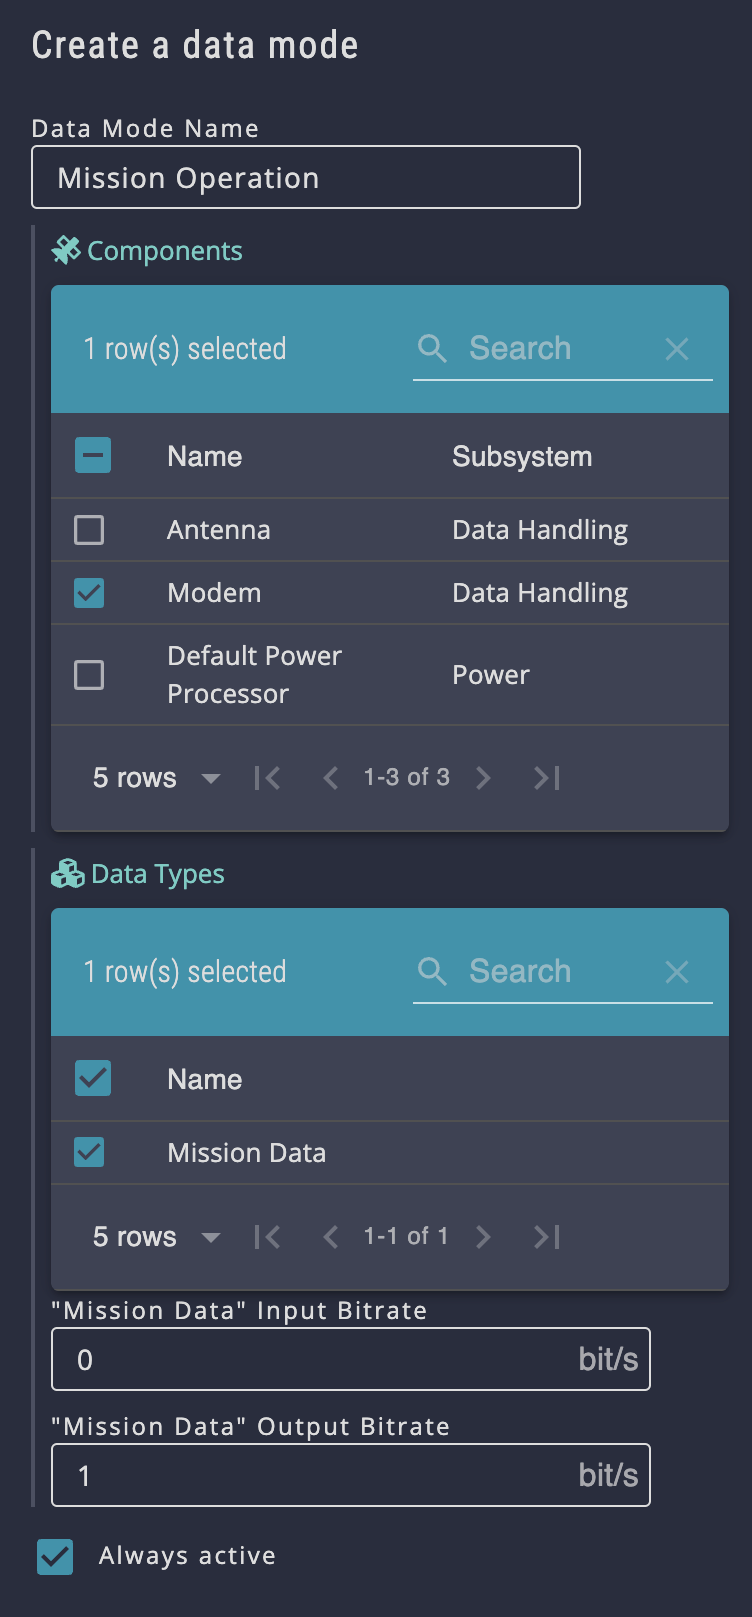
3d. Add a data mode
Create a Peripheral Target and Point at It
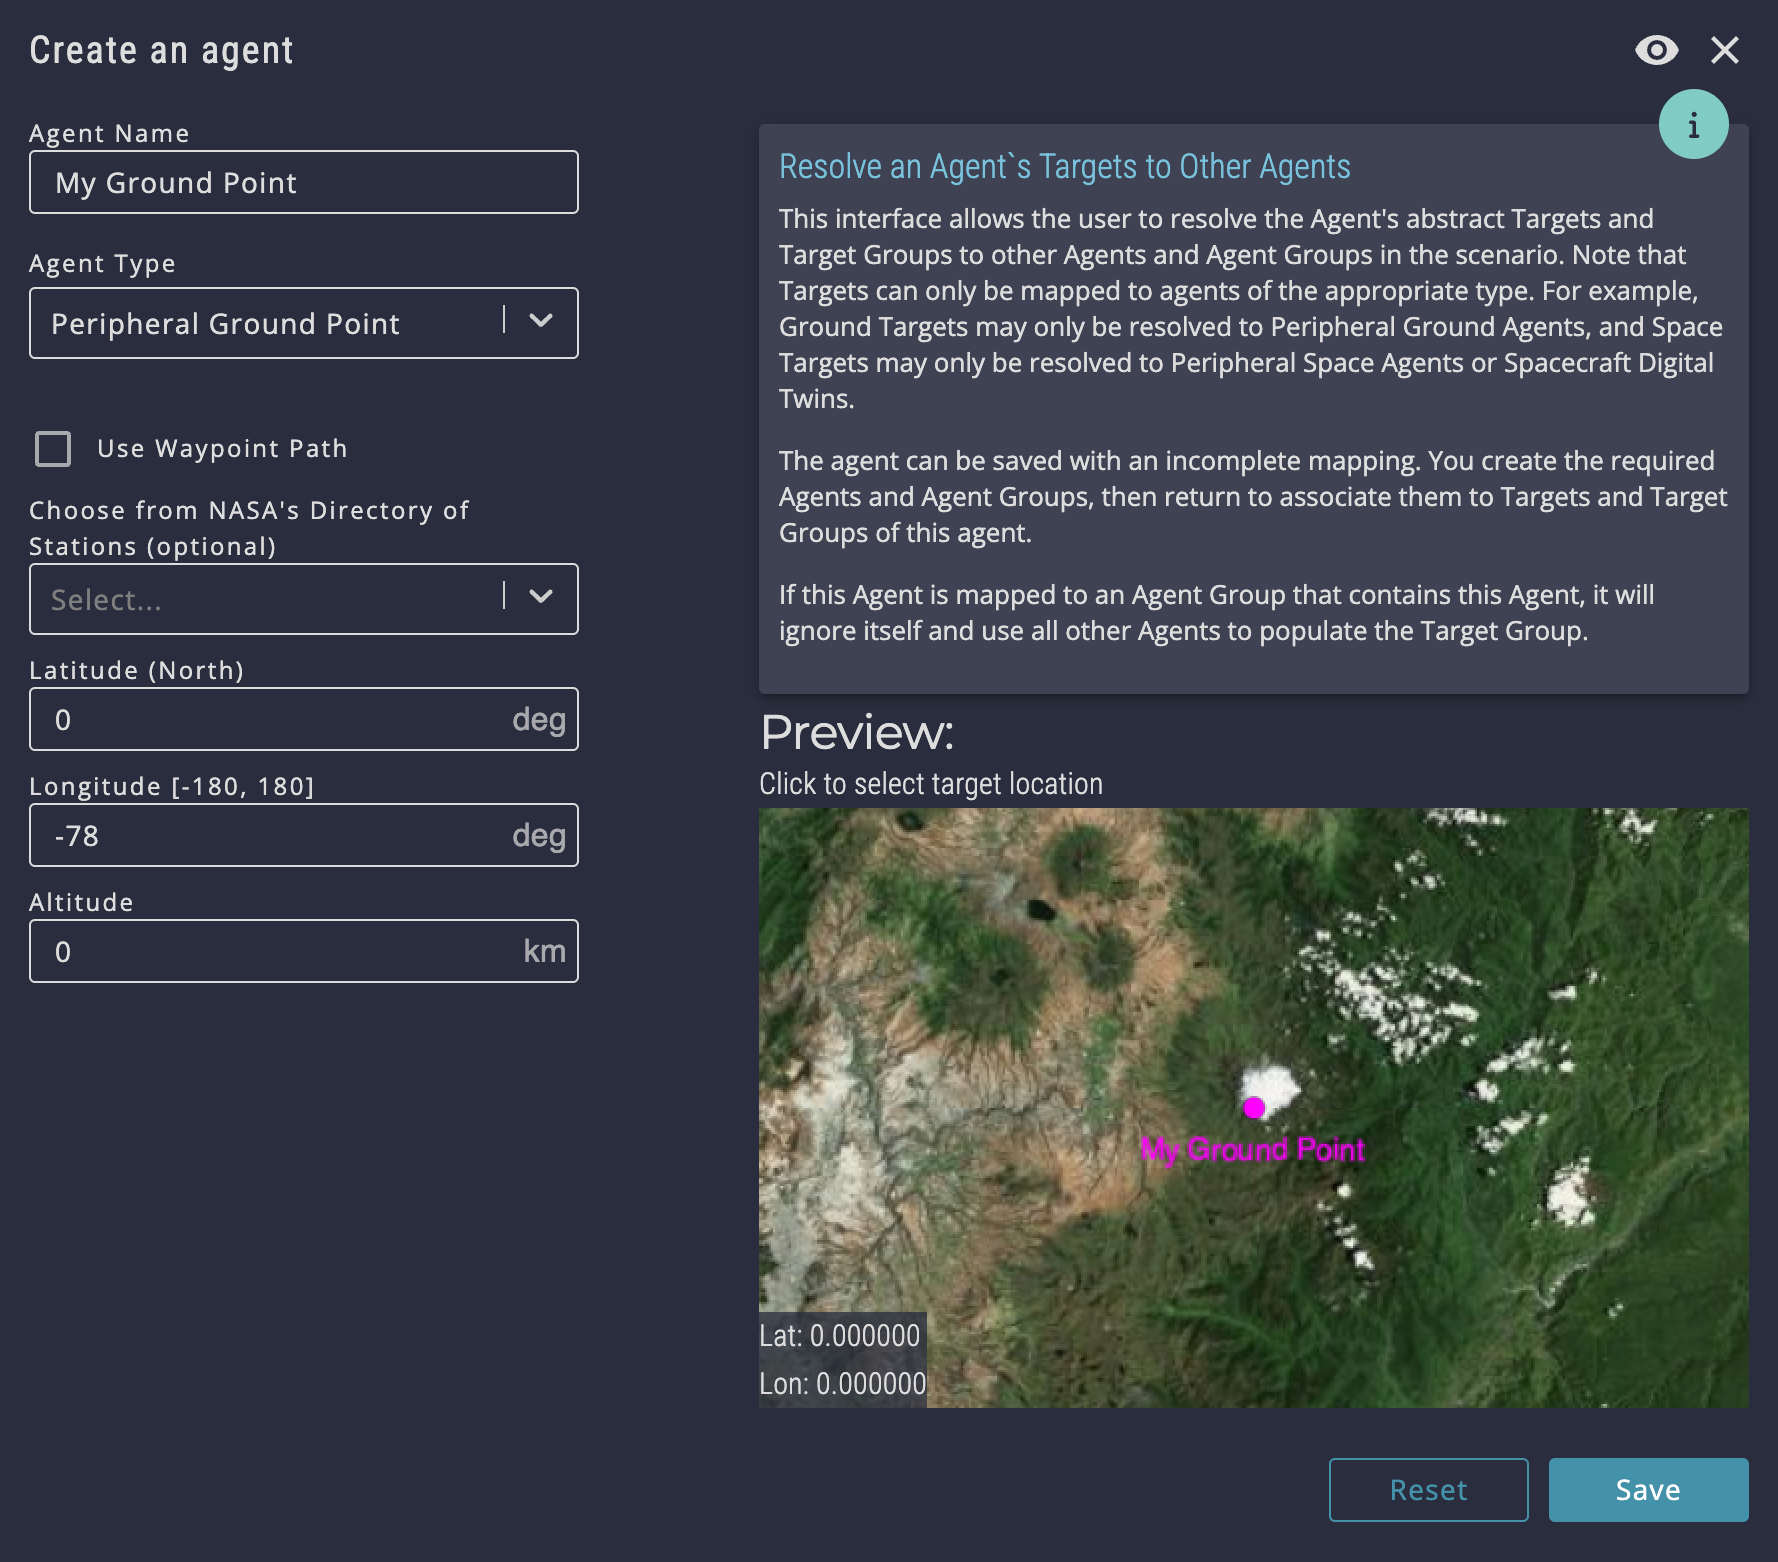
Here is where we use a peripheral agent for the first time - a ground point representing a city. It doesn't need to do anything special, so it doesn't need to be a templated agent. After we create it, we need to tell our in-orbit satellite to point at it.
-
In the scenario model, add a new agent
a. Agent Name: My Ground Point
b. Agent Type: Peripheral Ground Point
c. Latitude: 0, Longitude: -78 degrees, Altitude: 0 km
-
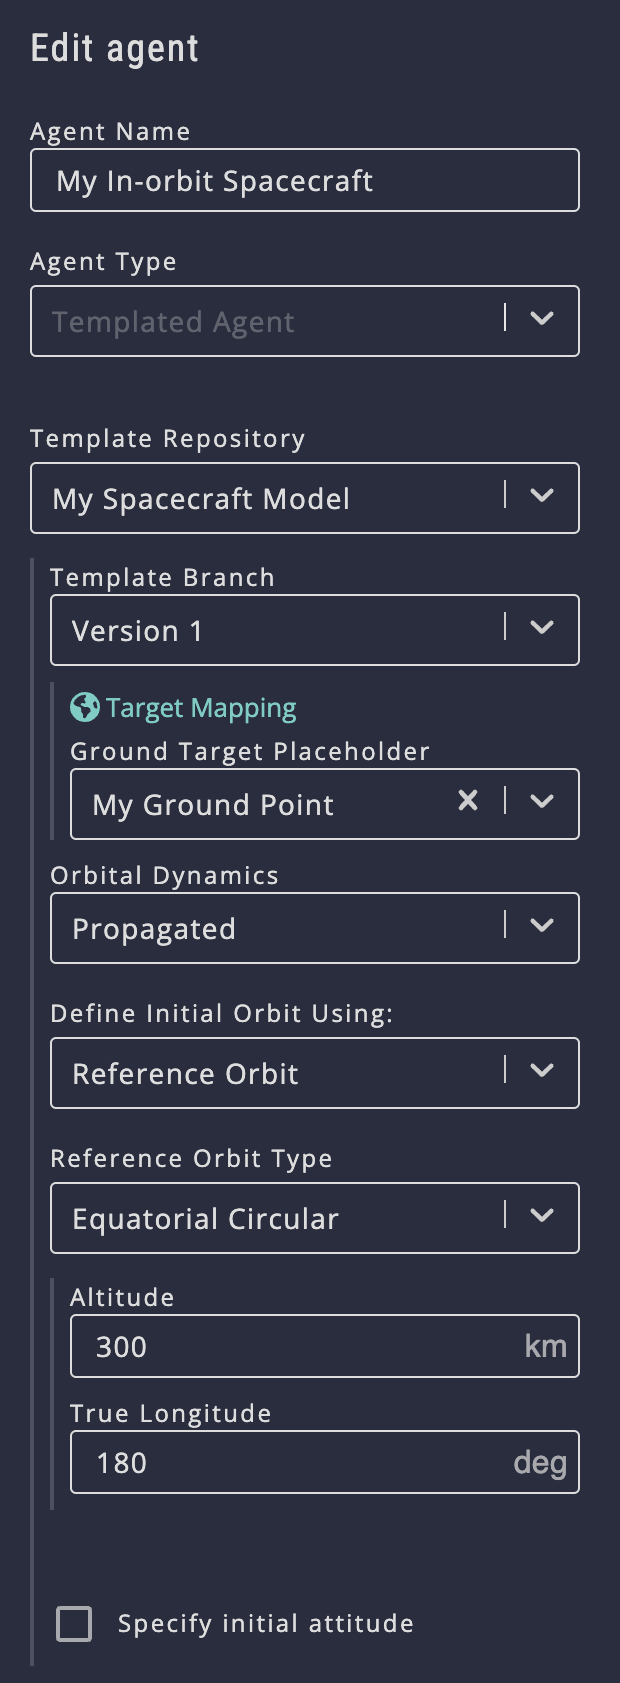
Open and edit My In-orbit Spacecraft. You'll see a blank placeholder for Target Mapping > Ground Target Placeholder. Select My Ground Point from the options.
-
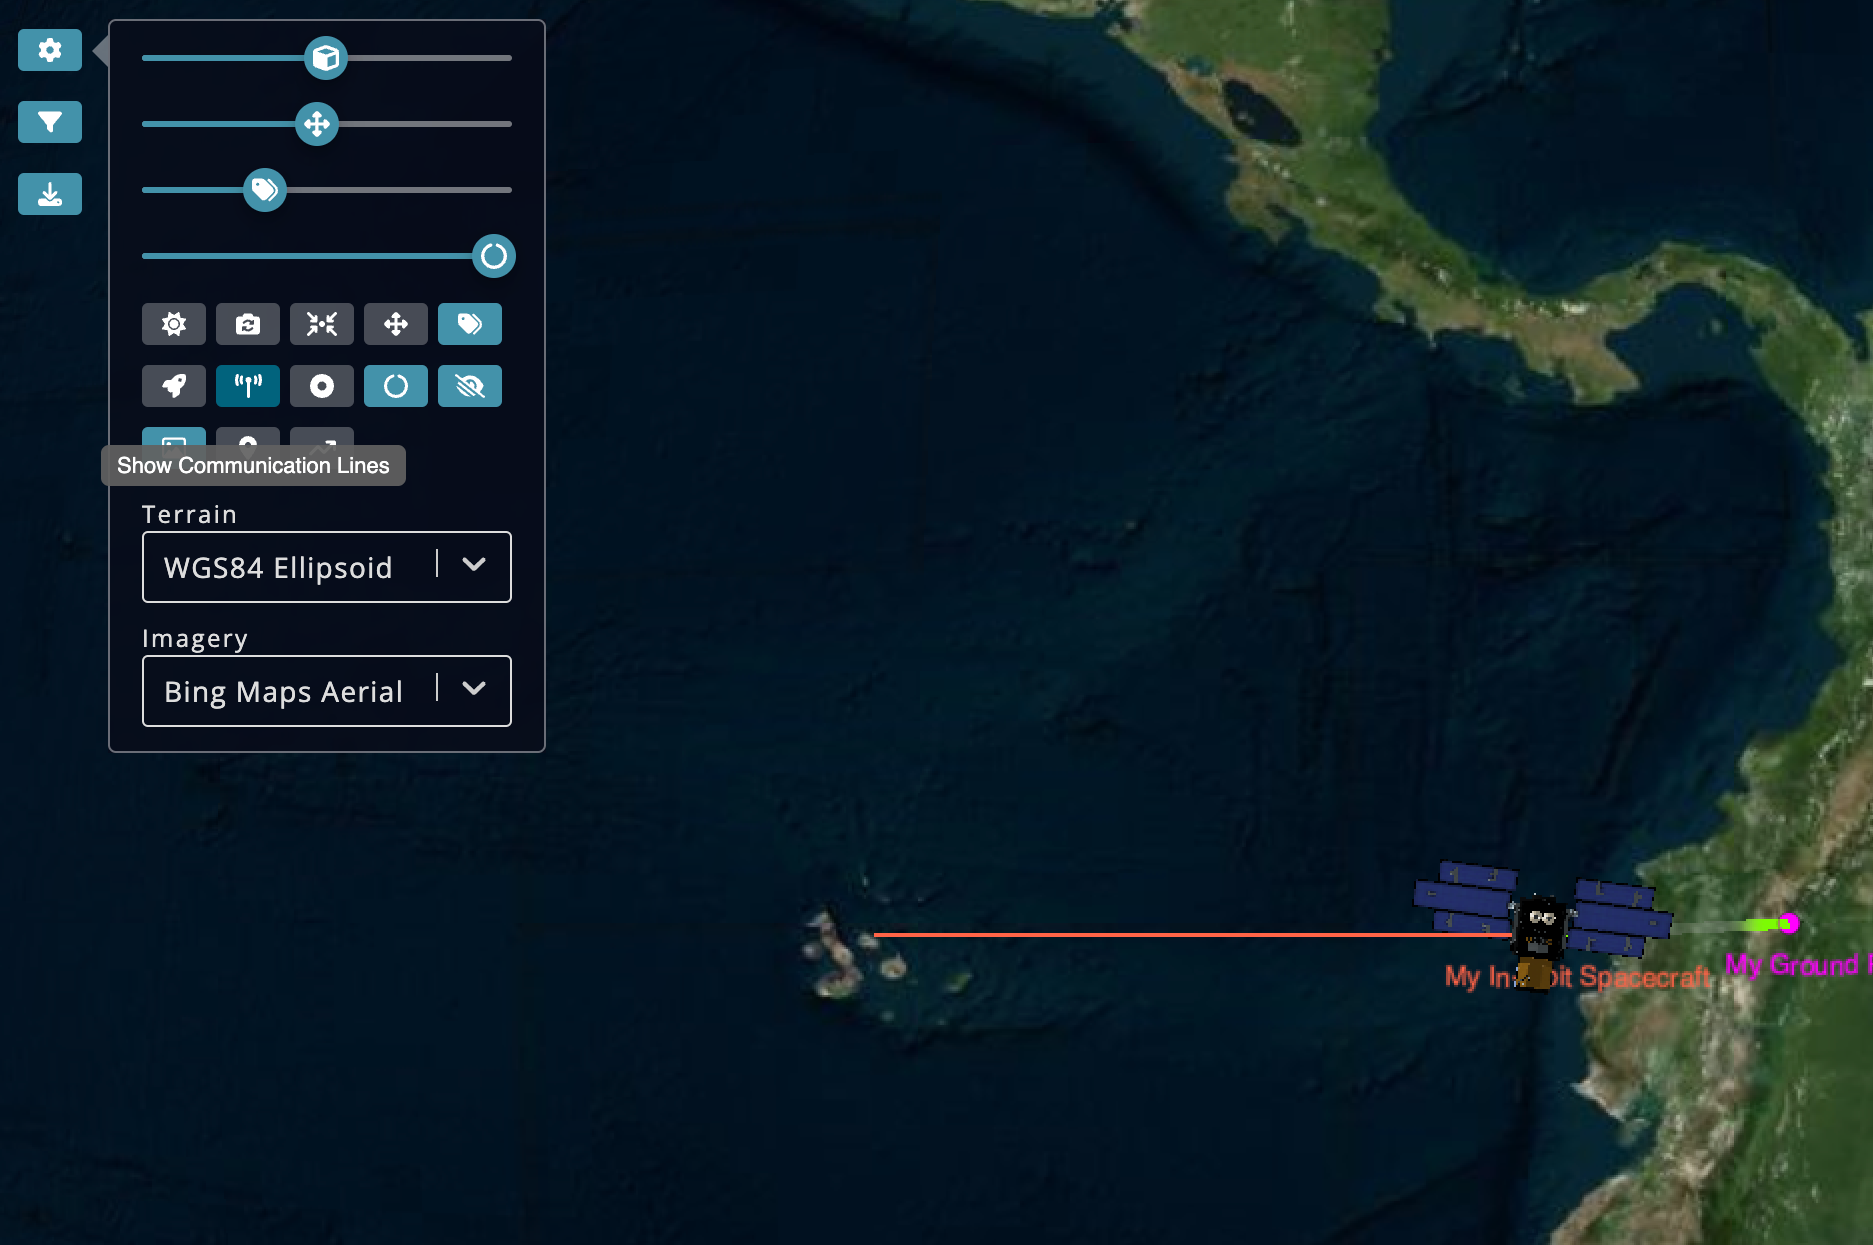
Simulate. The satellite will now make a direct pass over its target and initiate communication when the target is within its field of view.
-
To see the communications linkage, click the gear icon on the top left of the playback screen and toggle on Show Communications Lines.
1. Add a new peripheral agent
2. Specify the peripheral agent as the target
2. Specify the peripheral agent as the target
Notes
- For simplicity, we make the data mode and data interface, always active. You can also choose to activate them only under specific conditions using Routines.
- The data mode only needs a value for Output, since we are creating data to transmit.
- Thermal properties on components are optional if you are not activating the Thermal module. You can ignore all those kinds of fields. If a field is necessary to simulate, we'll let you know before you can simulate.
- When we added a target in the spacecrafts' template, it was just a placeholder. That's why we also needed to open the actual in-orbit satellite inside our scenario and tell it to use the new peripheral ground point as its target. Whenever you have target placeholders on a template, they need to be filled for every copy of your template in your scenario. If some of the spacecraft in your scenario don't need all the same target placeholders, that is when you would create a new spacecraft version (aka branch). You can preserve all the other configurations from your first version/branch and delete some of the target placeholders.
- If you are working out of separate browser windows for your spacecraft and your scenario, you many need to refresh the Scenario edit screen to see the Target Mapping field.
4. Proactive Pointing
Creating Dynamic Pointing Logic
-
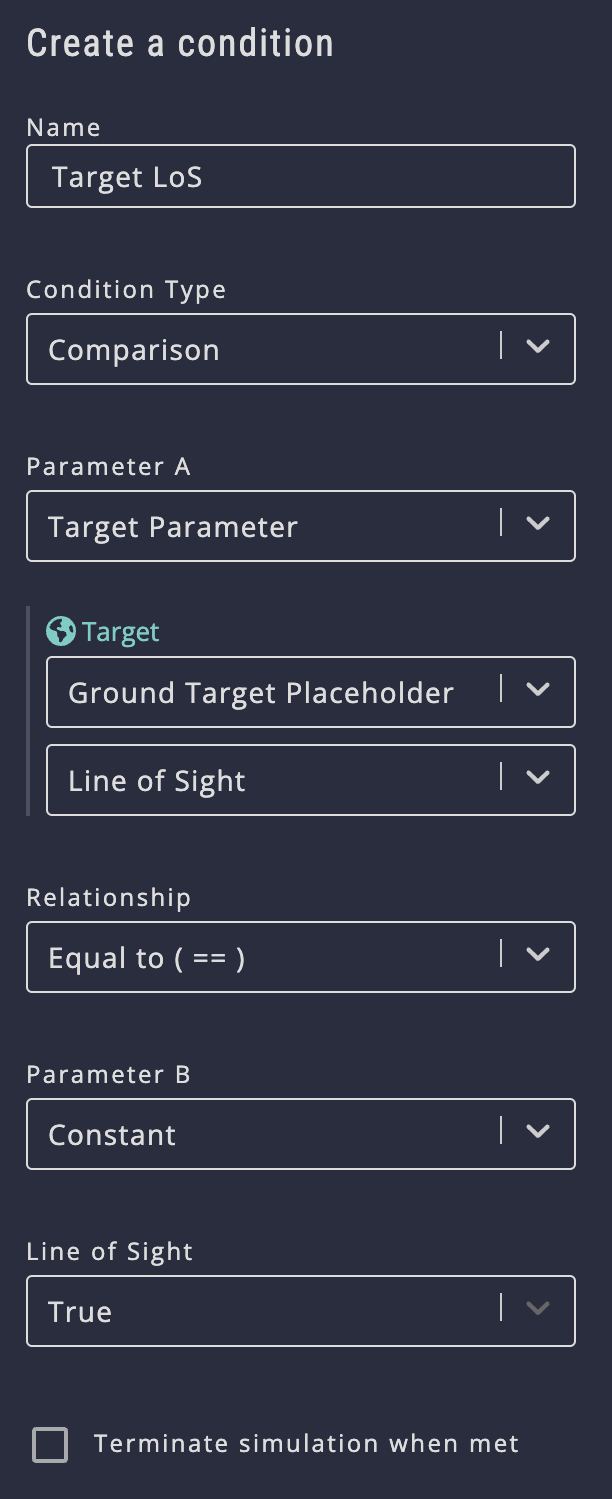
In the Command & Control > Conditions section, add a condition:
a. Name: Target LoS
b. Condition Type: Comparison
c. Parameter A: Target Parameter
d. Target: Ground Target Placeholder > Line of Sight
e. Relationship: Equal to (==)
f. Parameter B: Constant
g. Line of Sight: True
-
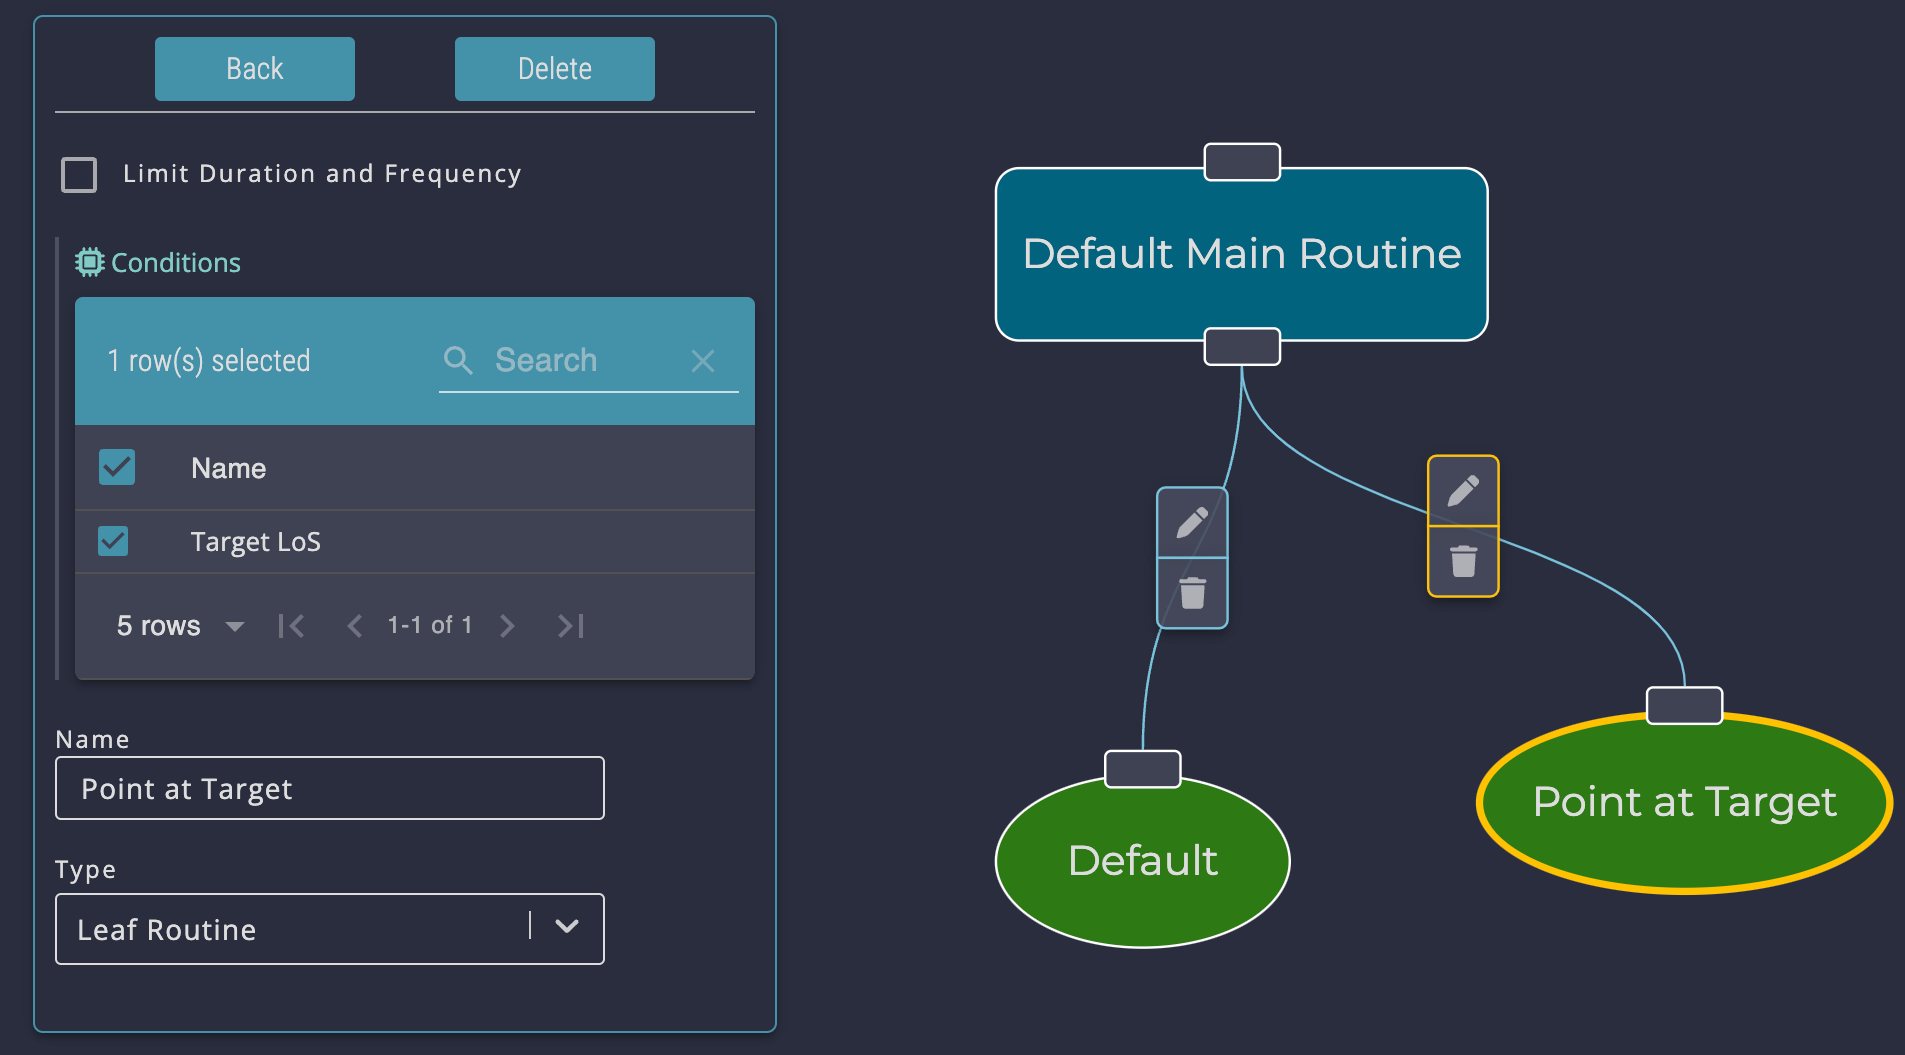
In the Command & Control > Routines section, add a leaf routine by dragging the bottom handle of the Default Main Routine to an empty space on the canvas. A dialog box should appear.
a. Name the node "Point at Target"
b. Select the "Target LoS" condition
c. Click the Dialog's Back button to close the dialog box
d. Click the Save button at the bottom left of the screen
e. (In the future, you can double-click the node to edit the name or click the pencil icon to select conditions)
f. Double-click the Default Main Routine and confirm that “Point Target” is above “Default”
-
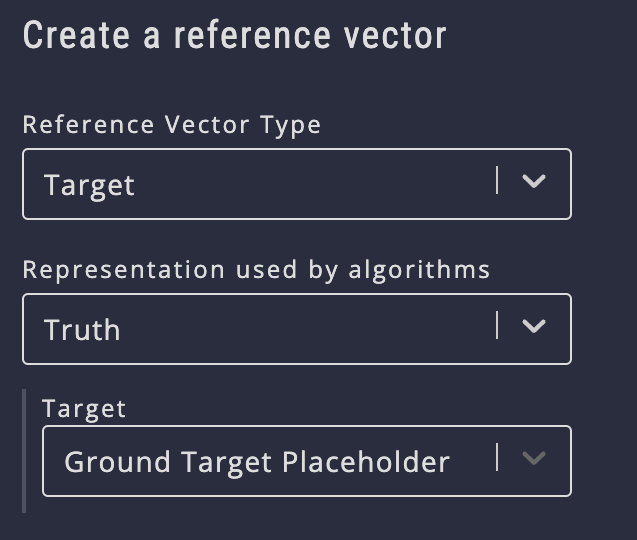
In the Geometry > Reference Vector section, add a reference vector to point to the target:
a. Reference Vector Type: Target
b. Representation used by algorithms: Truth
c. Target: Ground Target Placeholder
-
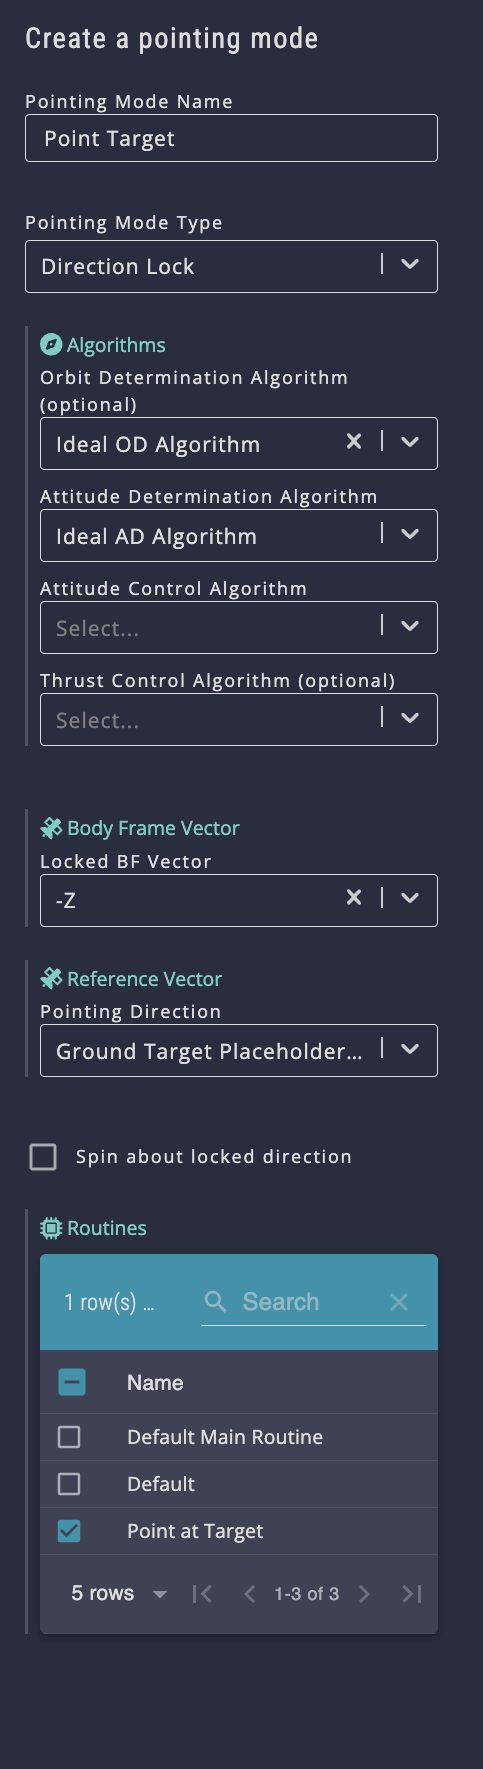
In the GNC > Pointing Modes section, add a pointing mode:
a. Pointing Mode Name: Point Target
b. Pointing Mode Type: Direction Lock
c. Orbit Determination Algorithm: Ideal OD Algorithm
d. Attitude Determination Algorithm: Ideal AD Algorithm
e. Locked BF Vector: -Z
f. Pointing Direction: Ground Target Placeholder - Target Truth
g. Routines: Point at Target
-
Go back to your scenario and simulate it. The satellite will now proactively point at the ground target as soon as the line of sight condition is met.
1. Add a condition
2a-b. Set up the routine
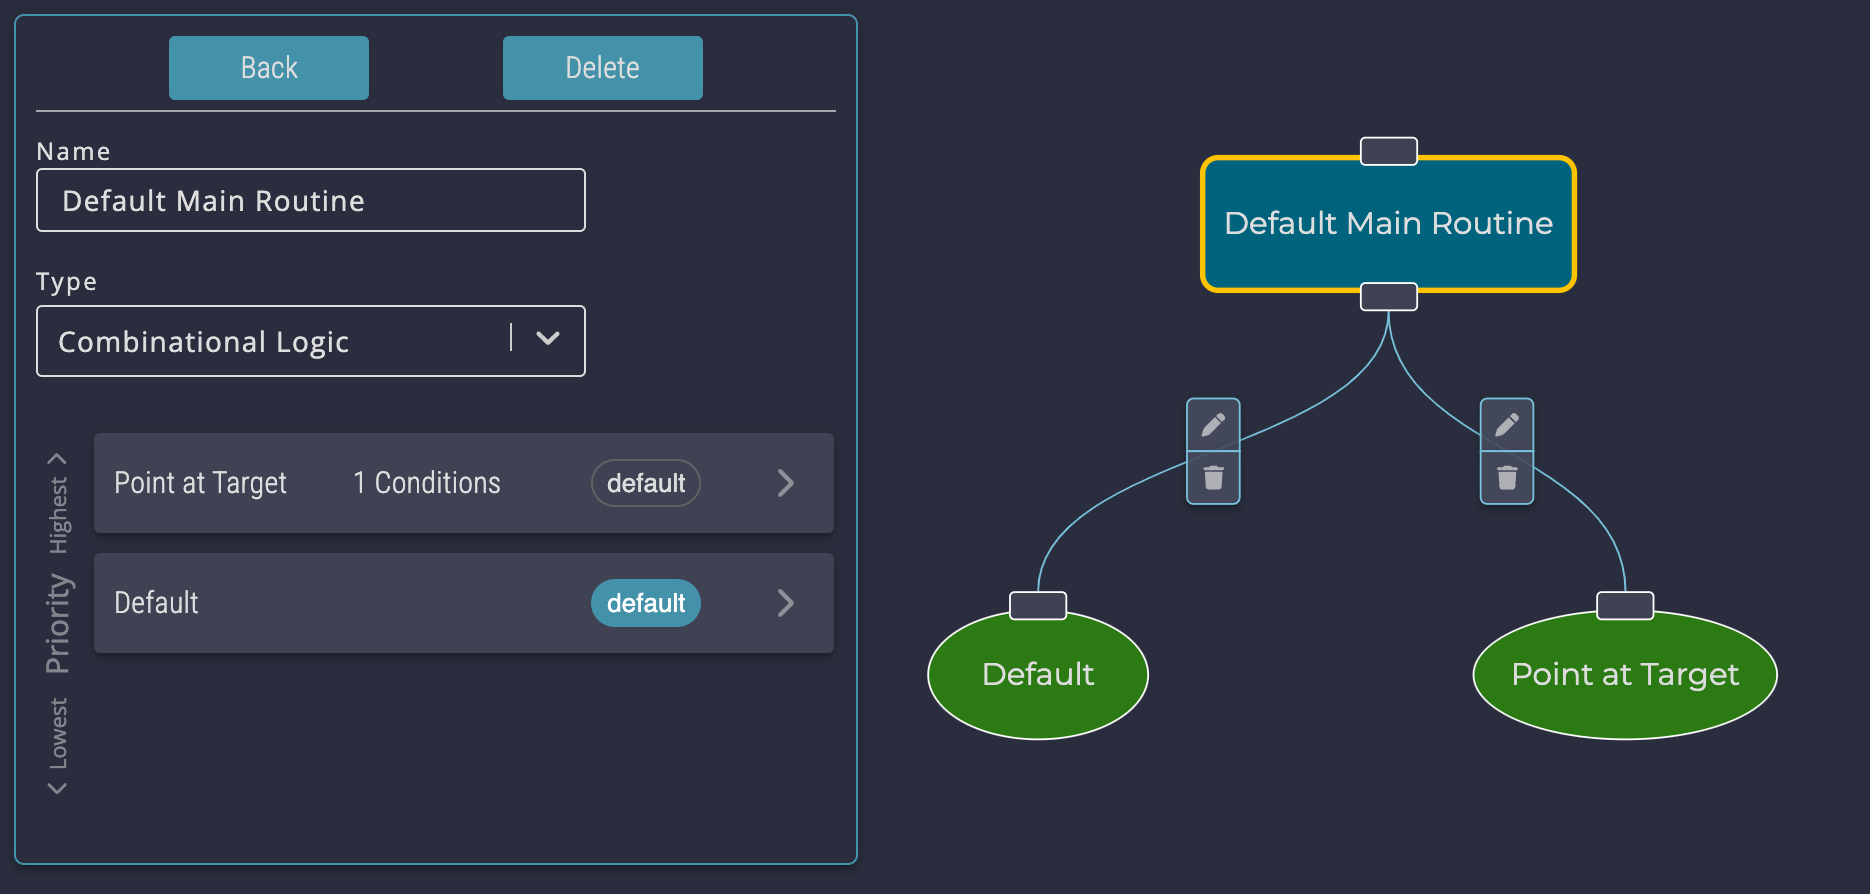
2f. Confirm routine order
3. Add a reference vector
4. Add a pointing mode
Notes
- By prioritizing the Point at Target routine above the Default routine, the satellite will honor Point Target’s conditions before it will honor the default routine.
5. Analyzing Results
Now that you have put a satellite in orbit and done interesting things, where can you see the results?
- From the Scenario edit screen, click Analyze. A list of all your templated agent copies will appear. (In our case, we only have one.)
- Select the agent you want to inspect.
- Navigate to different sections and inspect till your heart's content.
We haven't set up many internal mechanics in our spacecraft, so there aren't a ton of charts that have data populated. But as you build out more capabilities in your spacecraft, here is where you will find them. If you want to taste what a full set of analytics looks like, you can view the analytics for a more complex model here.
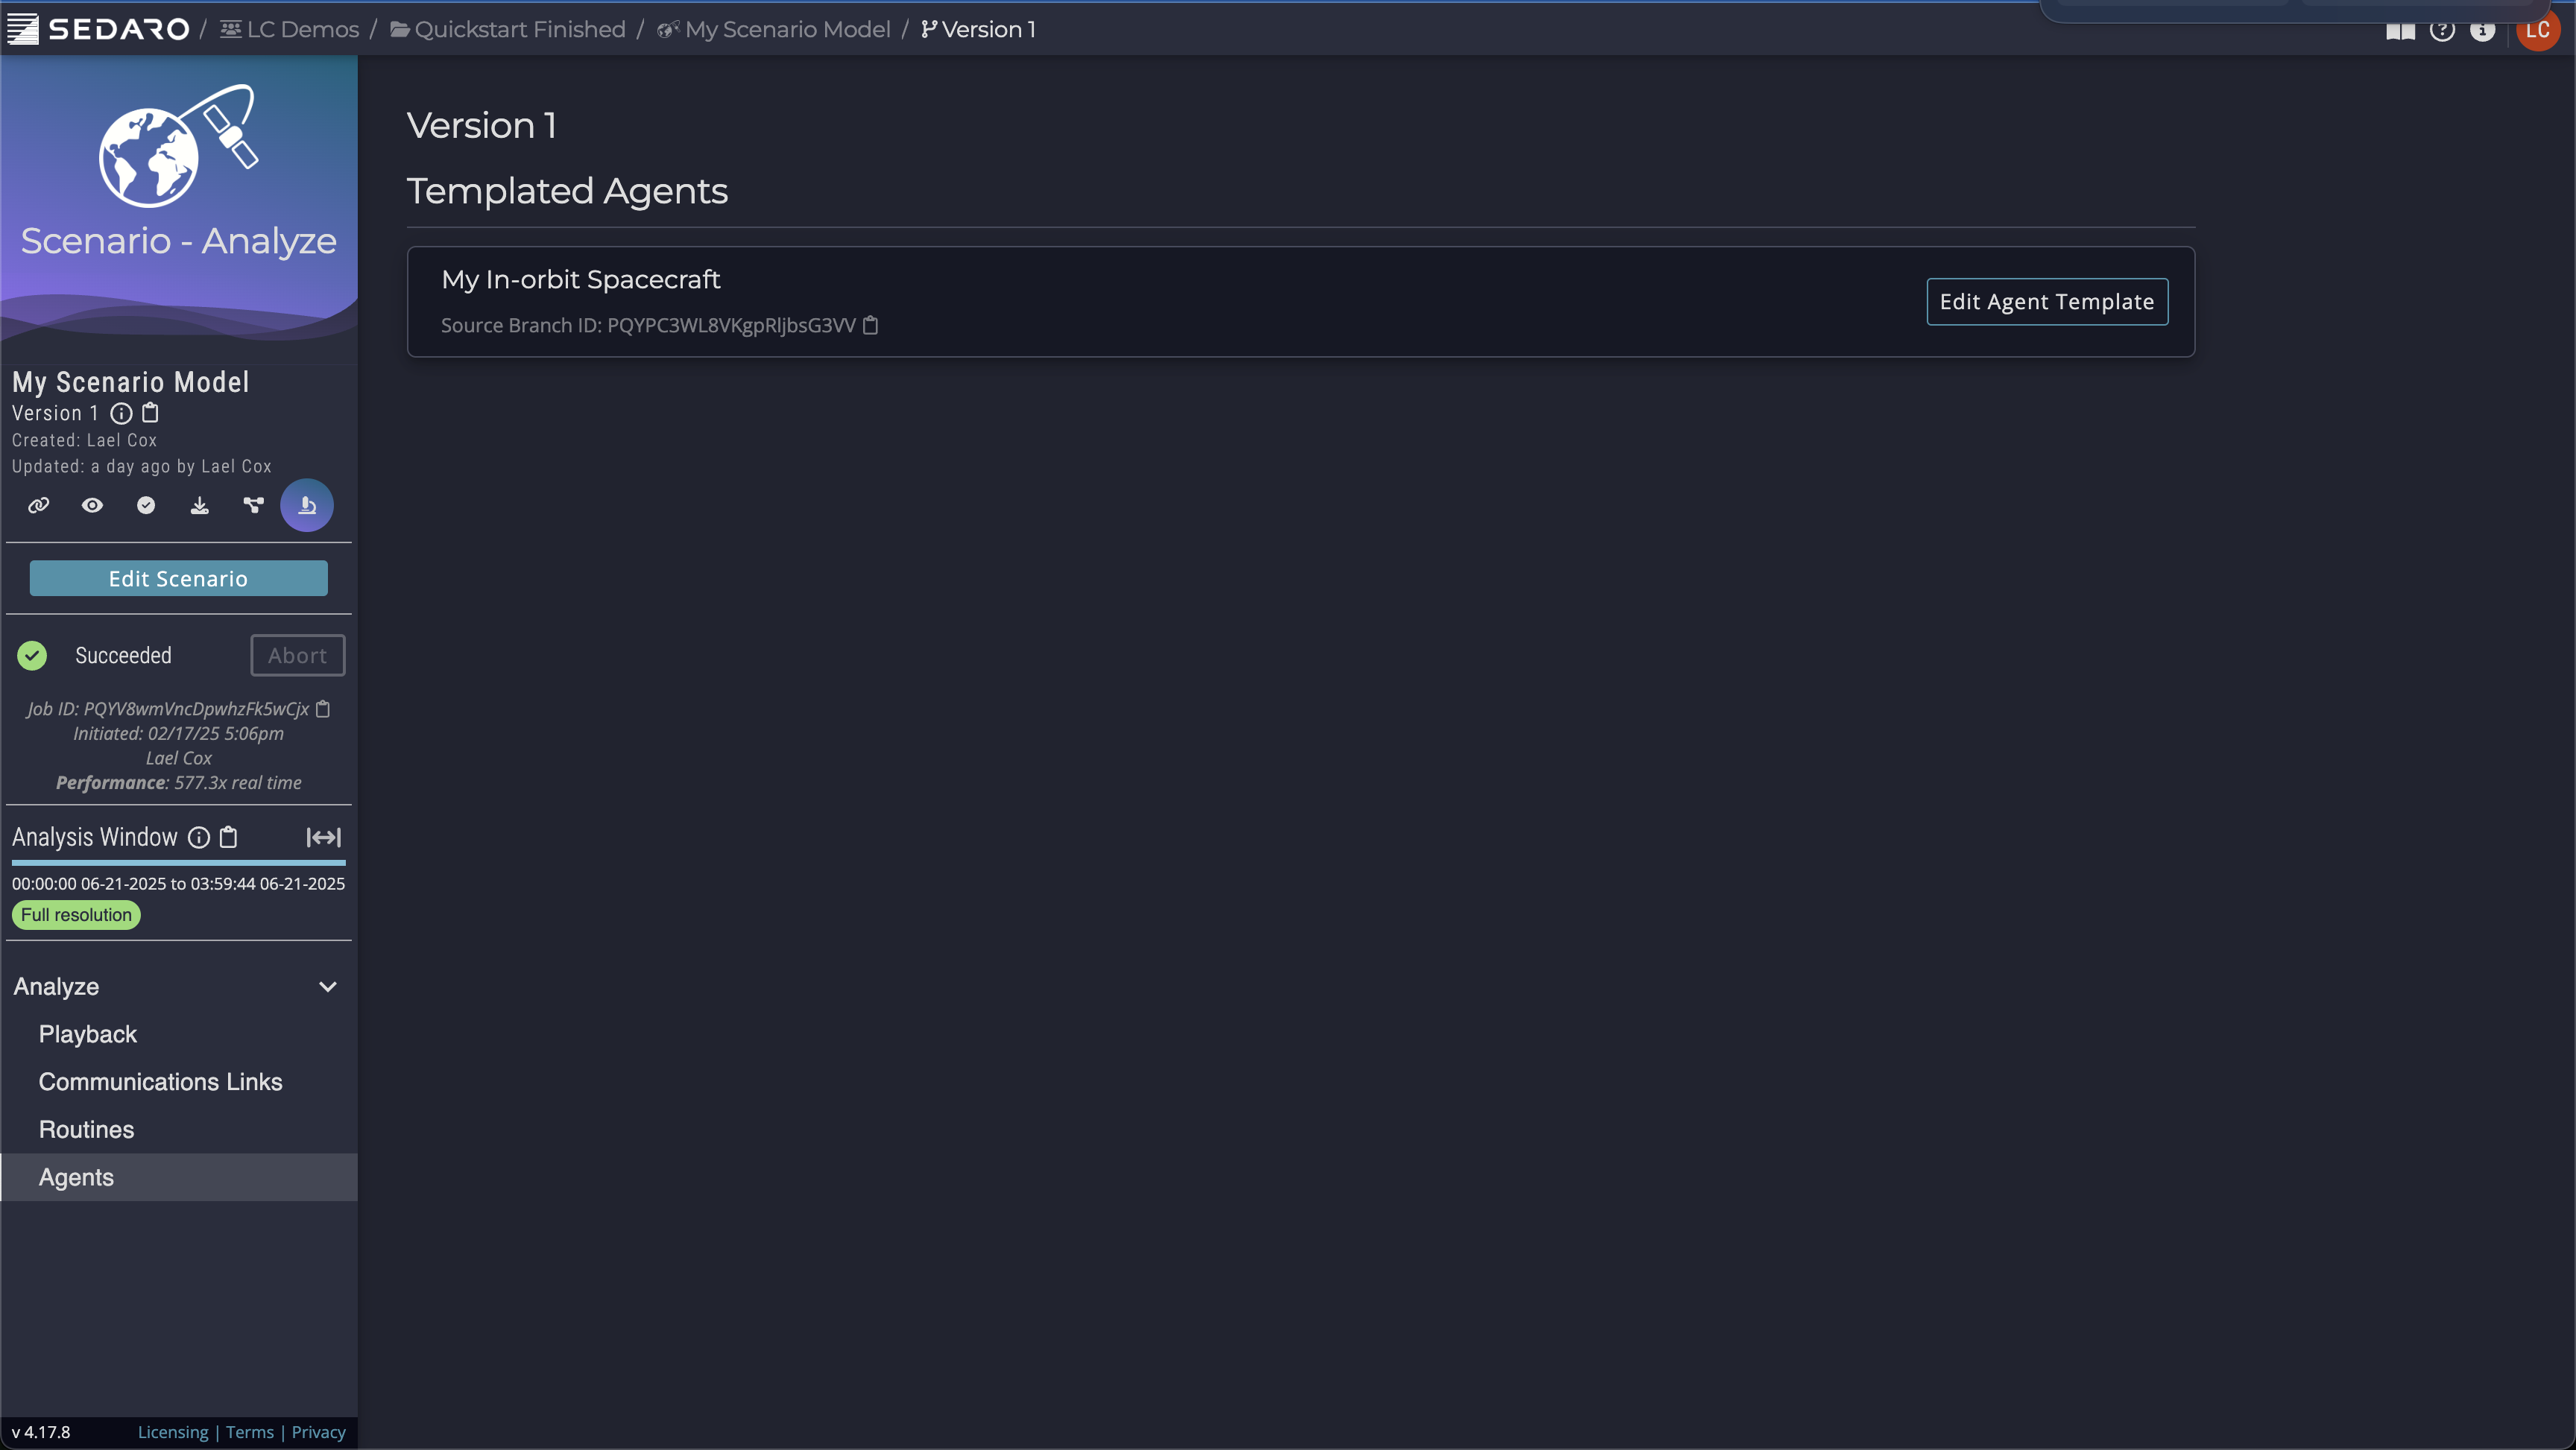
5. Analyze results
6. Wrap Up
That's it for the walk through. Hopefully it helps you get to know the basics of Sedaro's platform. There is a lot more that the platform can do. Look out for more articles to come profiling more of our features. Till then, happy simulating!